USB host
From Openmoko
(the USB port in host mode) |
(500mA and several other small changes) |
||
| Line 16: | Line 16: | ||
Normally, USB host ports provide power to any connected USB device. In the case of portable handheld devices, this power may be limited. (Usually the battery is sized to power the handheld device alone, and to maximize standby time.) | Normally, USB host ports provide power to any connected USB device. In the case of portable handheld devices, this power may be limited. (Usually the battery is sized to power the handheld device alone, and to maximize standby time.) | ||
| − | Available power in host mode is limited to | + | Available power in host mode is limited to 500mA on the Neo FreeRunner, and no power is available in host mode on the Neo 1973. If your USB devices consumes less than 500mA, you may connect it directly to your Neo FreeRunner. |
| − | + | To power USB-host-mode on Neo 1973, or if you want to apply external power to Neo FreeRunner while in host-mode, you can provide power by using a powered USB hub (see below), or by manually injecting power into the attached USB device (and Neo FreeRunner) via a modified USB cable (Y-cable (C)jr, described further below). | |
=== Powered USB hubs known to work with the Neo === | === Powered USB hubs known to work with the Neo === | ||
| Line 26: | Line 26: | ||
=== Providing power to run and charge the Neo while in host mode === | === Providing power to run and charge the Neo while in host mode === | ||
| − | A slightly separate issue is power to run and charge the Neo itself. When the USB port is in device mode, the Neo can be powered and recharged via the USB port, but when in standard host mode, the Neo FreeRunner is set to provide power and does not charge. Fortunately, control of the direction of power (in or out) is independent of the personality of the USB port (host or device): | + | A slightly separate issue is power to run and charge the Neo (both types) itself. When the USB port is in device mode, the Neo FreeRunner/1973 can be powered and recharged via the USB port, but when in standard host mode, the Neo FreeRunner is set to provide power and does not charge. Fortunately, control of the direction of power (in or out) is independent of the personality of the USB port (host or device): |
To recap, the direction of power can be controlled: | To recap, the direction of power can be controlled: | ||
| Line 34: | Line 34: | ||
echo "0" > /sys/devices/platform/neo1973-pm-host.0/hostmode | echo "0" > /sys/devices/platform/neo1973-pm-host.0/hostmode | ||
| − | Set to 1, provides up to | + | Set to 1, provides up to 500mA USB power at the USB port (FreeRunner only), disables charging from USB, and applies 15K pulldowns to USB D+ and D-: |
echo "1" > /sys/devices/platform/neo1973-pm-host.0/hostmode | echo "1" > /sys/devices/platform/neo1973-pm-host.0/hostmode | ||
| − | Next, power must somehow be injected. | + | Next, power must somehow be injected. An unmodified powered USB hub only provides power to the connected devices, but not to the connected host, so the only solution here is to modify a USB-hub¹) or to create a custom cable which will inject power into the host. |
| + | |||
| + | ¹) often it's sufficient to short a diode in USB-hub to feed power to the host-connector too. | ||
=== Modified USB cable to inject power while in host mode === | === Modified USB cable to inject power while in host mode === | ||
| Line 46: | Line 48: | ||
* A mini-USB type B cable for the Neo itself | * A mini-USB type B cable for the Neo itself | ||
* A cable of whatever type to go to your USB device. | * A cable of whatever type to go to your USB device. | ||
| − | * A cable going to a +5V | + | * A cable going to a +5V +/-10%(max!) power supply with enough power for your device and to charge the Neo. This could be a wall charger or even another USB plug. |
You connect the Data+ and Data- wires of the Neo and the device, and connect all of the ground wires together and all of the +5V wires together. This powers the Neo and the device, while letting the neo talk to the device. | You connect the Data+ and Data- wires of the Neo and the device, and connect all of the ground wires together and all of the +5V wires together. This powers the Neo and the device, while letting the neo talk to the device. | ||
| − | You have to connect 2pcs 15kOhm resistors, one from D+ to ground, and one from D- to ground, to comply with USB-spec for hostmode, as | + | You have to connect 2pcs 15kOhm resistors, one from D+ to ground, and one from D- to ground, to comply with USB-spec for hostmode, as Neo is switching off the internal resistors when you enable charging/powering over USB by asserting EN_USBHOST. |
See schematics, LOCATION:49XX | See schematics, LOCATION:49XX | ||
| Line 65: | Line 67: | ||
echo -n "fast_cccv" > /sys/devices/platform/s3c2410-i2c/i2c-adapter/i2c-0/0-0008/chgmode | echo -n "fast_cccv" > /sys/devices/platform/s3c2410-i2c/i2c-adapter/i2c-0/0-0008/chgmode | ||
| + | |||
| + | (Also this should be done by kernel when seeing 47K at ID-pin) | ||
== DIY USB host adapter == | == DIY USB host adapter == | ||
| Line 72: | Line 76: | ||
[[Image:2-usb-receptables.jpg]] | [[Image:2-usb-receptables.jpg]] | ||
| − | :#Find an old motherboard with a set of two USB | + | :#Find an old motherboard with a set of two USB receptacles as shown above. |
| − | :#Desolder this set of | + | :#Desolder this set of receptacles from the motherboard. This can be bit tricky but it is doable at least with a desoldering gun. |
| − | :#Each | + | :#Each receptacle has four pins. Use a multimeter to verify that you have no short circuits between the pins or the shield. |
:#Solder adjacent pins together (GND to GND, D- to D-, D+ to D+, VCC to VCC). | :#Solder adjacent pins together (GND to GND, D- to D-, D+ to D+, VCC to VCC). | ||
| − | :#(Optional) Build a test cable. Cut an USB cable with A plug into half, connect it a | + | :#(Optional) Build a test cable. Cut an USB cable with A plug into half, connect it a receptacle and again measure that you have no short circuits. Then connect the test cable to PC and verify that you see |
black GND | black GND | ||
green 0V | green 0V | ||
white 0V | white 0V | ||
red +5V | red +5V | ||
| − | :#Freerunner is shipped with a mini-B-to-A-plug cable. Connect this to a | + | :#Freerunner is shipped with a mini-B-to-A-plug cable. Connect this to a receptacle. |
| − | :#(Optional)Connect test cable to | + | :#(Optional)Connect test cable to the other receptacle and verify that you see |
black GND | black GND | ||
green 0V | green 0V | ||
| Line 93: | Line 97: | ||
red +5V | red +5V | ||
when it acts as a host. | when it acts as a host. | ||
| − | :#At your own risk, switch freerunner to USB host mode and connect an USB device to | + | :#At your own risk, switch freerunner to USB host mode and connect an USB device to the other receptacle of the adapter. Here's how the setup should look like: |
[[Image:Usb-gender-changer1.jpg]] | [[Image:Usb-gender-changer1.jpg]] | ||
| Line 100: | Line 104: | ||
=== Compatibility === | === Compatibility === | ||
| − | The adapter works with kingston data traveller 4G memory stick and aiptec pencam webcam. However, for some reason it did not work with any of the tested USB keyboards or mice: | + | The adapter works with kingston data traveller 4G memory stick and aiptec pencam webcam. However, for some reason (probably the missing 15k resistors at D+ and D-) it did not work with any of the tested USB keyboards or mice: |
usb 1-2: new full speed USB device using s3c2410-ohci and address 24 | usb 1-2: new full speed USB device using s3c2410-ohci and address 24 | ||
usb 1-2: device descriptor read/64, error -62 | usb 1-2: device descriptor read/64, error -62 | ||
Revision as of 23:12, 26 August 2008
Contents |
USB host
The mini-USB port on both the Neo 1973 and the Neo FreeRunner supports both USB host and USB device. This opens up a range of possibilities, such as adding USB cameras and USB input devices.
By default, the mini-USB port is in device mode. To tell the device that it is logically a host:
echo "host" > /sys/devices/platform/s3c2410-ohci/usb_mode
Instruct the device to provide 5 volts (not available on Neo 1973):
echo "1" > /sys/devices/platform/neo1973-pm-host.0/hostmode
Note: You may want to run ifconfig usb0 down prior to switching to USB host mode, as the Neo's USB networking may not like having its USB port disappear. You'll probably want to ssh into your Neo over WiFi or Bluetooth before starting all of this, alternatively use an on screen keyboard.
Providing power to connected USB devices while in host mode
Normally, USB host ports provide power to any connected USB device. In the case of portable handheld devices, this power may be limited. (Usually the battery is sized to power the handheld device alone, and to maximize standby time.)
Available power in host mode is limited to 500mA on the Neo FreeRunner, and no power is available in host mode on the Neo 1973. If your USB devices consumes less than 500mA, you may connect it directly to your Neo FreeRunner.
To power USB-host-mode on Neo 1973, or if you want to apply external power to Neo FreeRunner while in host-mode, you can provide power by using a powered USB hub (see below), or by manually injecting power into the attached USB device (and Neo FreeRunner) via a modified USB cable (Y-cable (C)jr, described further below).
Powered USB hubs known to work with the Neo
(please add any known to work)
Providing power to run and charge the Neo while in host mode
A slightly separate issue is power to run and charge the Neo (both types) itself. When the USB port is in device mode, the Neo FreeRunner/1973 can be powered and recharged via the USB port, but when in standard host mode, the Neo FreeRunner is set to provide power and does not charge. Fortunately, control of the direction of power (in or out) is independent of the personality of the USB port (host or device):
To recap, the direction of power can be controlled:
Set to 0 (default), no power is provided at the USB port, charging is enabled, and host 15K pulldowns are removed from D+ and D-:
echo "0" > /sys/devices/platform/neo1973-pm-host.0/hostmode
Set to 1, provides up to 500mA USB power at the USB port (FreeRunner only), disables charging from USB, and applies 15K pulldowns to USB D+ and D-:
echo "1" > /sys/devices/platform/neo1973-pm-host.0/hostmode
Next, power must somehow be injected. An unmodified powered USB hub only provides power to the connected devices, but not to the connected host, so the only solution here is to modify a USB-hub¹) or to create a custom cable which will inject power into the host.
¹) often it's sufficient to short a diode in USB-hub to feed power to the host-connector too.
Modified USB cable to inject power while in host mode
Three-headed cables are required if you want to power the FreeRunner / USB device whilst in host mode. For many uses the FreeRunner provides sufficient power to make such a cable unnecessary. At the moment, you'll have to manufacture this one yourself. You need to make a cable with three ends:
- A mini-USB type B cable for the Neo itself
- A cable of whatever type to go to your USB device.
- A cable going to a +5V +/-10%(max!) power supply with enough power for your device and to charge the Neo. This could be a wall charger or even another USB plug.
You connect the Data+ and Data- wires of the Neo and the device, and connect all of the ground wires together and all of the +5V wires together. This powers the Neo and the device, while letting the neo talk to the device. You have to connect 2pcs 15kOhm resistors, one from D+ to ground, and one from D- to ground, to comply with USB-spec for hostmode, as Neo is switching off the internal resistors when you enable charging/powering over USB by asserting EN_USBHOST. See schematics, LOCATION:49XX
Just for reference, the USB wires from left to right are:
- Black: Power -
- Green: Data -
- White: Data +
- Red: Power +
The Mini_USB-B connector has a fifth pin, the ID-pin. This pin is supposed to be short to ground to signal Freerunner to enter hostmode. For the Y-cable and enabling external power while in hostmode, you may connect a 47kOhm resistor from ID-pin to ground. This is the same trick the OM-wallcharger uses to signal to Freerunner it can charge with 1A. Future kernels should switch to hostmode + external power when seeing this 47k resistor.
Power Concerns
You'll need to force the Neo to go into fast charge mode, since it can't do its usual power negotiation over USB.
echo -n "fast_cccv" > /sys/devices/platform/s3c2410-i2c/i2c-adapter/i2c-0/0-0008/chgmode
(Also this should be done by kernel when seeing 47K at ID-pin)
DIY USB host adapter
Note that these instructions are provided in the hope that they are useful but without any warranty!
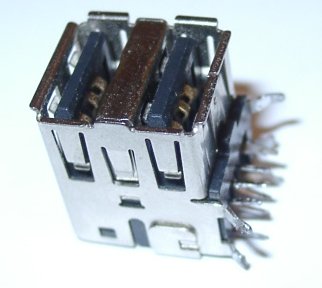
- Find an old motherboard with a set of two USB receptacles as shown above.
- Desolder this set of receptacles from the motherboard. This can be bit tricky but it is doable at least with a desoldering gun.
- Each receptacle has four pins. Use a multimeter to verify that you have no short circuits between the pins or the shield.
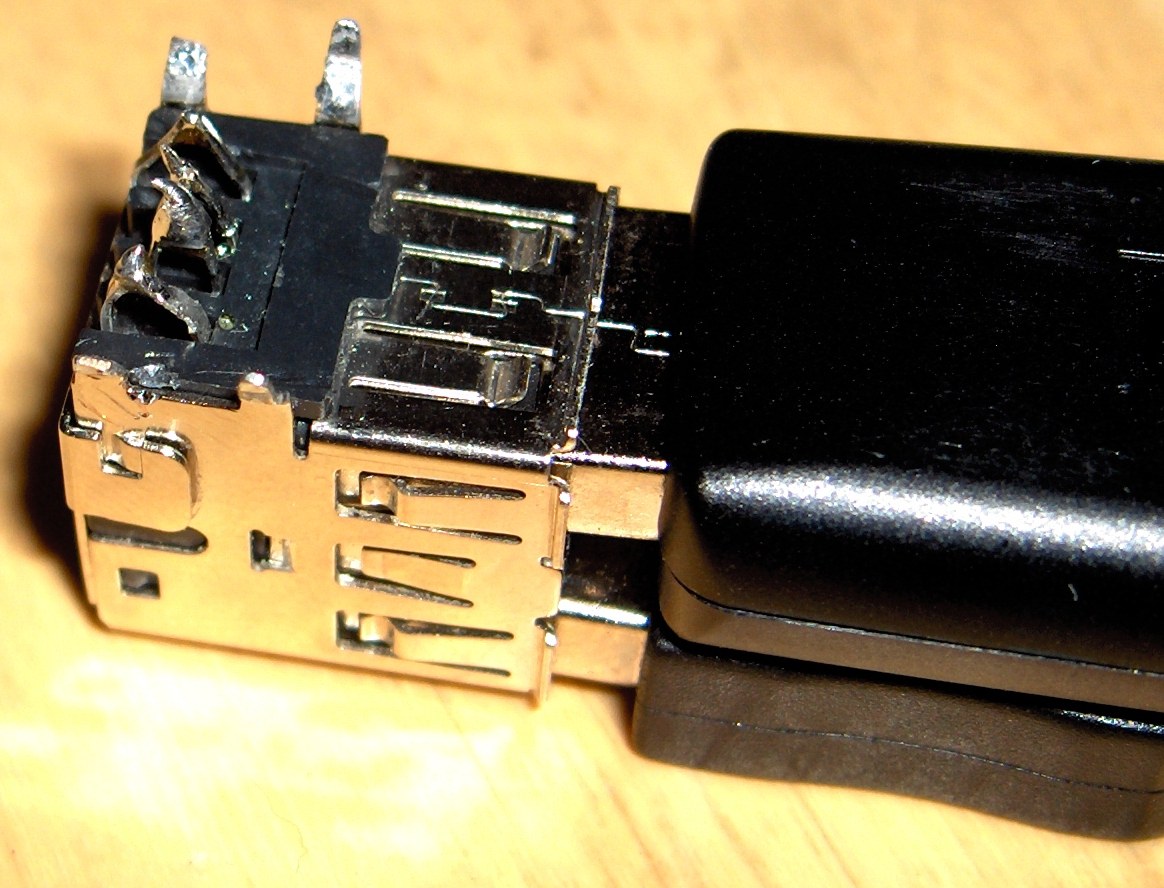
- Solder adjacent pins together (GND to GND, D- to D-, D+ to D+, VCC to VCC).
- (Optional) Build a test cable. Cut an USB cable with A plug into half, connect it a receptacle and again measure that you have no short circuits. Then connect the test cable to PC and verify that you see
black GND
green 0V
white 0V
red +5V
- Freerunner is shipped with a mini-B-to-A-plug cable. Connect this to a receptacle.
- (Optional)Connect test cable to the other receptacle and verify that you see
black GND
green 0V
white 0V
red 0V
when freerunner acts as a device and
black GND
green 0V
white 0V
red +5V
when it acts as a host.
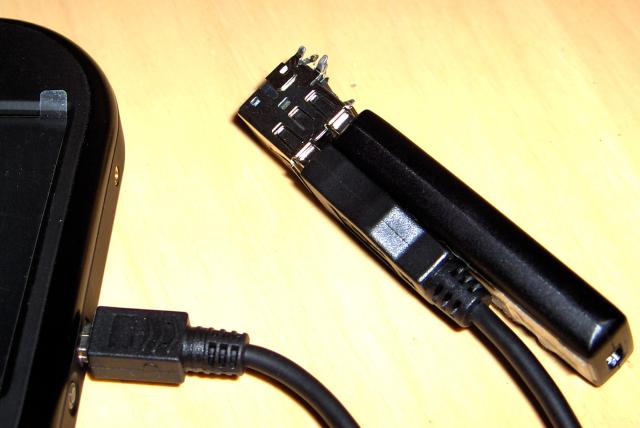
- At your own risk, switch freerunner to USB host mode and connect an USB device to the other receptacle of the adapter. Here's how the setup should look like:
Compatibility
The adapter works with kingston data traveller 4G memory stick and aiptec pencam webcam. However, for some reason (probably the missing 15k resistors at D+ and D-) it did not work with any of the tested USB keyboards or mice:
usb 1-2: new full speed USB device using s3c2410-ohci and address 24
usb 1-2: device descriptor read/64, error -62
usb 1-2: device descriptor read/64, error -62
usb 1-2: new full speed USB device using s3c2410-ohci and address 25
usb 1-2: device descriptor read/64, error -62
usb 1-2: device descriptor read/64, error -62
usb 1-2: new full speed USB device using s3c2410-ohci and address 26
usb 1-2: device not accepting address 26, error -62
usb 1-2: new full speed USB device using s3c2410-ohci and address 27
usb 1-2: device not accepting address 27, error -62
However, if I connect neo to small (unpowered) USB hub
usb 1-2: new full speed USB device using s3c2410-ohci and address 61
usb 1-2: configuration #1 chosen from 1 choice
hub 1-2:1.0: USB hub found
hub 1-2:1.0: 4 ports detected
and connect the keyboard to the hub then it is correctly recognized:
usb 1-2.3: new low speed USB device using s3c2410-ohci and address 62
usb 1-2.3: configuration #1 chosen from 1 choice
input:   USB Keyboard as /devices/platform/s3c2410-ohci/usb1/1-2/1-2.3/1-2.3:1.0/input/input13
input: USB HID v1.10 Keyboard [  USB Keyboard] on usb-s3c24xx-2.3
input:   USB Keyboard as /devices/platform/s3c2410-ohci/usb1/1-2/1-2.3/1-2.3:1.1/input/input14
input: USB HID v1.10 Device [  USB Keyboard] on usb-s3c24xx-2.3
With the hub I can also use both keyboard and usb memory stick at the same time.
Power consumption
When I unplug the USB hub (with only keyboard connected to it) the power consumption estimate at /sys/devices/platform/bq2700-battery.0/power_supply/bat/current_now decreases from 175000 to 145000 (are these microamperes?).


