Specialized USB cables
From Openmoko
(→USB hubs that can be used like a Y-cable without modifications) |
(→USB hubs that can be used like a Y-cable without modifications) |
||
| Line 196: | Line 196: | ||
== USB hubs that can be used like a Y-cable without modifications == | == USB hubs that can be used like a Y-cable without modifications == | ||
| − | [http://www.dealextreme.com/details.dx/sku.13526 Cable Style Dual-Power 1000mA USB 2.0 4-Port Hub]. Connect power source to the red upstream connector and openmoko to the black upstream connector. Then connect USB devices to the downstream ports. After settings usb_mode=host the openmoko will charge and will still be able to talk to the downstream ports. | + | [http://www.dealextreme.com/details.dx/sku.13526 Cable Style Dual-Power 1000mA USB 2.0 4-Port Hub]. Connect power source to the red upstream connector and openmoko to the black upstream connector. Then connect USB devices to the downstream ports. After settings usb_mode=host the openmoko will charge and will still be able to talk to the downstream ports.<br> |
also available on ebay: [http://cgi.ebay.com/High-Speed-Smart-3-Ports-USB-Hub-5-Pin-Cable-for-PC_W0QQitemZ260567368077QQcmdZViewItemQQptZLH_DefaultDomain_0?hash=item3cab06818d] | also available on ebay: [http://cgi.ebay.com/High-Speed-Smart-3-Ports-USB-Hub-5-Pin-Cable-for-PC_W0QQitemZ260567368077QQcmdZViewItemQQptZLH_DefaultDomain_0?hash=item3cab06818d] | ||
Revision as of 09:20, 13 March 2010
| NOTE: work in progress |
Attaching the Neo (acting as a USB host) to a USB device
The USB port (5 position mini type B jack) on the Neo 1973 and Neo FreeRunner can be both a USB device or a USB host. The provided cable (5 position mini type B plug to type A plug) is used when attaching the Neo to a USB host.
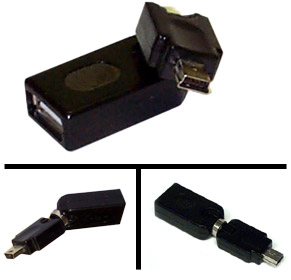
A specialized cable is required when attaching the Neo to a USB device. (The device has a USB type A jack).
(picture)
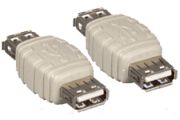
Alternately, an adapter capable of connecting two type A plugs will allow attaching the provided USB cable to the USB cable that came with the USB device. This adapter is also known as a gender changer.
(picture)
Ready-made mini type A plug to a type A jack adapter
You can now purchase a proper custom-manufacturered mini-A to full-sized A USB adapter from here. This adapter already has Pins 4 and 5 shorted together internally; the unique form factor also makes it very handy and eliminated the need for things like the double USB female adapter trick shown at the bottom of this page.
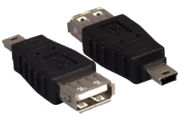
Ready-made mini type B plug to a type A jack cable
You can buy [this] ready-made USB A-Type Female to USB Mini-B Type 5 Pin Male Adapter.
It is available in Europe from Openmoko distributor Goldelico: http://www.handheld-linux.com/wiki.php?page=Neo%20Freerunner%3AUSB%20Adapter
A Mini-B to Female-A cable is also available from www.usbfirewire.com.
Adapter $1.45 including worldwide shipping, http://www.dealextreme.com/details.dx/sku.26783 --Schorhr 05:24, 16 September 2009 (UTC)
How to make a mini type B plug to a type A jack cable
(picture, as soon as I build it)
Parts list:
- Mini type B plug: Digi-Key [H2958-ND]
- type A jack: I have not yet been able to find a source for these. Meanwhile, use the jack from a standard USB extension cord
- Cable: Ideally, the data lines should be twisted and 28 AWG, the power lines should be 20 or 28 AWG, e.g. Hitachi Cable [49248 ]
Construction instructions:
(TBA)
Ready-made type A jack to a type A jack adapter (gender changer)
You can buy [this] ready-made USB Type A Female to Female Gender Changer.
How to make a type A jack to a type A jack adapter (gender changer)
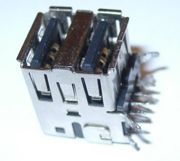
This community provided instruction shows how to build an adapter from a USB socket salvaged from a computer motherboard.
Note that these instructions are provided in the hope that they are useful but without any warranty!
- Find an old motherboard with a set of two USB receptacles as shown above.
- Desolder this set of receptacles from the motherboard. This can be bit tricky but it is doable at least with a desoldering gun. Solder braid (available at electronic parts stores including Radio Shack) works better than even a professional desoldering gun and is a lot cheaper.
- Each receptacle has four pins. Use a multimeter to verify that you have no short circuits between the pins or the shield.
- Solder adjacent pins together (GND to GND, D- to D-, D+ to D+, VCC to VCC).
- (Optional) Build a test cable. Cut an USB cable with A plug into half, connect it a receptacle and again measure that you have no short circuits. Then connect the test cable to PC and verify that you see
- black GND
- green 0V
- white 0V
- red +5V
- FreeRunner is shipped with a mini-B-to-A-plug cable. Connect this to a receptacle.
- (Optional)Connect test cable to the other receptacle and verify that you see
- black GND
- green 0V
- white 0V
- red 0V
when freerunner acts as a device and
- black GND
- green 0V
- white 0V
- red +5V
when it acts as a host.
- At your own risk, switch freerunner to USB host mode and connect an USB device to the other receptacle of the adapter. Here's how the setup should look like:
How to make a type A jack to a type A jack adapter (gender changer) without soldering
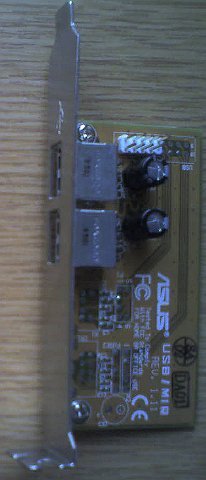
- Find a 2-port USB front-panel with a 9-pin connector. Usually you can get one from a PC motherboard package box.
- Align it in a way so you see the connector pins as a 2 row 5 column matrix with one pin missing.
- Use 4 staples to short the pins residing in a same column.
- FreeRunner is shipped with a mini-B-to-A-plug cable. Use it to connect the first port of your panel with your FreeRunner.
- At your own risk, switch freerunner to USB host mode and connect an USB device to the other receptacle of the adapter.
If you have a ASUS USB/MIR front panel, it is even easier - you can use jumpers to short the pins.
Compatibility
The adapter works with kingston data traveller 4G memory stick and aiptec pencam webcam. However, for some reason (probably the missing 15k resistors at D+ and D-) it did not work with any of the tested USB keyboards or mice:
usb 1-2: new full speed USB device using s3c2410-ohci and address 24
usb 1-2: device descriptor read/64, error -62
usb 1-2: device descriptor read/64, error -62
usb 1-2: new full speed USB device using s3c2410-ohci and address 25
usb 1-2: device descriptor read/64, error -62
usb 1-2: device descriptor read/64, error -62
usb 1-2: new full speed USB device using s3c2410-ohci and address 26
usb 1-2: device not accepting address 26, error -62
usb 1-2: new full speed USB device using s3c2410-ohci and address 27
usb 1-2: device not accepting address 27, error -62
However, if I connect neo to small (unpowered) USB hub
usb 1-2: new full speed USB device using s3c2410-ohci and address 61
usb 1-2: configuration #1 chosen from 1 choice
hub 1-2:1.0: USB hub found
hub 1-2:1.0: 4 ports detected
and connect the keyboard to the hub then it is correctly recognized:
usb 1-2.3: new low speed USB device using s3c2410-ohci and address 62
usb 1-2.3: configuration #1 chosen from 1 choice
input:   USB Keyboard as /devices/platform/s3c2410-ohci/usb1/1-2/1-2.3/1-2.3:1.0/input/input13
input: USB HID v1.10 Keyboard [  USB Keyboard] on usb-s3c24xx-2.3
input:   USB Keyboard as /devices/platform/s3c2410-ohci/usb1/1-2/1-2.3/1-2.3:1.1/input/input14
input: USB HID v1.10 Device [  USB Keyboard] on usb-s3c24xx-2.3
With the hub I can also use both keyboard and usb memory stick at the same time.
Power consumption
When I unplug the USB hub (with only keyboard connected to it) the power consumption estimate at /sys/devices/platform/bq2700-battery.0/power_supply/bat/current_now decreases from 175000 to 145000 (are these microamperes?).
Buy a USB Y cable for powering USB devices and charging the Freerunner while in host mode
You do not need to make a cable, you can just buy a "USB 2.0 Dual Power Cable, 2 x Type A to mini B" from lindy. You then plug (via an adapter) the central plug of the Y cable into the upstream port (B socket or A plug) of your powered USB hub, the other A plug of the Y cable into one of the A sockets of your hub, and the mini-B plug of the Y cable into your Freerunner. Put your Freerunner into USB unpowered host mode. It will charge and you can plug a keyboard, a mouse, a disk, cable modem, etc, into the hub.
Adapters, A female to B male or A female to A female, are easy to find on the net. You will need a "A female to B male" if your hub has a type B socket or a "A female to A female" if your hub has a type A plug.
How to make a USB cable for powering attached USB devices and charging the Neo while in host mode (aka Y-Cable)
| NOTE: work in progress |
This method was invented by Joerg Reisenweber, and was since implemented practically by many community members. See http://lists.openmoko.org/pipermail/community/2008-March/013978.html .
--- You can find some pictures (schematics, parts and part numbers at http://om.quatrox.org/om/ but be careful!!! Report any bugs to quatrox (irc #openmoko, #openmoko-cdevel, #ocp at freenode.org) ---
This cable might be necessary for a number of reasons, e.g.
- The application requires that the Neo not become suspended
- The application requires long run time
- The attached USB device consumes a lot of power
(However, as there is a wide range[1] of USB hubs out there, one might find power (on a powered USB hub) is available already on the hub's mini USB 5 pin socket already, so not need a specialized cable after all! Check with a test meter.)
These instructions will show you how to make a cable with 3 ends:
- A mini-USB type B cable for the Neo itself
- A cable of whatever type to go to your USB device.
- A cable going to a +5V +/-10%(max!) power supply with enough power for your device and to charge the Neo. This could be a wall charger or even another USB plug.
You connect the Data+ and Data- wires of the Neo and the device, and connect all of the ground wires together and all of the +5V wires together. This powers the Neo and the device, while letting the neo talk to the device. You have to connect 2 pcs 15k ohm resistors, one from D+ to ground, and one from D- to ground, to comply with USB-spec for hostmode, as Neo is switching off the internal resistors when you enable charging/powering over USB by asserting EN_USBHOST. See schematics, LOCATION:49XX
Just for reference, the USB wires from left to right are:
- Black: Power -
- Green: Data -
- White: Data +
- Red: Power +
The Mini_USB-B connector has a fifth pin, the ID-pin. This pin is supposed to be short to ground to signal FreeRunner to enter hostmode. For the Y-cable and enabling external power while in hostmode, you may connect a 47k ohm resistor from ID-pin to ground. This is the same trick the OM-wallcharger uses to signal to FreeRunner it can charge with 1A. Future kernels should switch to hostmode + external power when seeing this 47k resistor.
Parts
USB 2.0 Plug type A to mini 5 pin USB Plug type B that should include the ID signal, so that you can add the 47k ohm resistor to ID-pin to trigger fast charging
- firefold
- Belkin 5 pin (find reference)
- https://www.argentdata.com/catalog/product_info.php?products_id=111
- http://www.partsdata.de/USB_Mini-B-Verlaengerung_Kabel_1m_CU-XB05-10.html
USB hubs that can be used like a Y-cable without modifications
Cable Style Dual-Power 1000mA USB 2.0 4-Port Hub. Connect power source to the red upstream connector and openmoko to the black upstream connector. Then connect USB devices to the downstream ports. After settings usb_mode=host the openmoko will charge and will still be able to talk to the downstream ports.
also available on ebay: [2]

