QtMoko
From Openmoko
(→Data Safety / Boot Errors) |
(→SVG Keyboards (from QtMoko v45 onwards)) |
||
| Line 502: | Line 502: | ||
what to do. Only thing to explain is how you should name the key XML elements. | what to do. Only thing to explain is how you should name the key XML elements. | ||
In Inkscape go to Edit->XML editor and click on key. The element name must be | In Inkscape go to Edit->XML editor and click on key. The element name must be | ||
| − | in form: | + | in form:'' |
key_QtKeycode_unicode | key_QtKeycode_unicode | ||
| − | For possible QtKeycode values check this link [http://qt-project.org/doc/qt-4.8/qt.html#Key-enum qt-keycodes] and for unicode values use | + | ''For possible QtKeycode values check this link [http://qt-project.org/doc/qt-4.8/qt.html#Key-enum qt-keycodes] and for unicode values use |
your favourite unicode character map. | your favourite unicode character map. | ||
'' | '' | ||
| Line 523: | Line 523: | ||
====DE_de Layout==== | ====DE_de Layout==== | ||
| + | This layout has a portrait and a landscape mode for the abc.svg keyboard (more a SMS keyboard now). The portrait mode is default which means that abc.svg is just a copy of abc_portrait.svg. If you prefer the landscape mode just copy the abc_landscape.svg to abc.svg. | ||
| + | |||
<gallery widths=250px heights=370> | <gallery widths=250px heights=370> | ||
| − | File:DE de abc.png | abc.svg | + | File:DE de abc portrait.png | abc_portrait.svg = default abc.svg |
| + | File:DE de abc landscape.png | abc_landscape.svg | ||
File:DE de qwerty.png | qwerty.svg | File:DE de qwerty.png | qwerty.svg | ||
File:DE de qwerty shift.png | qwerty_shift.svg | File:DE de qwerty shift.png | qwerty_shift.svg | ||
Revision as of 07:44, 29 June 2012
| Languages: |
English • العربية • Български • Česky • Dansk • Deutsch • Esperanto • Eesti • Español • فارسی • Suomi • Français • עברית • Magyar • Italiano • 한국어 • Nederlands • Norsk (bokmål) • Polski • Português • Română • Русский • Svenska • Slovenčina • Українська • 中文(中国大陆) • 中文(台灣) • Euskara • Català |
QtMoko is a Debian based distribution for the Neo FreeRunner. The phone and user interface are based on Qt Extended Improved formerly known as Qtopia. The QtMoko wiki can be found here.
Download
Further information on QtMoko and the current state of development can be found on its website.
Sourceforge Download
Download the following files from radekp download to you desktop computer:
OpenMobile.nl Download
This downloadable QtMoko-Image does not need the installation procedure of the following sections:
- OpenMobile Installer is a zip-file that contains images.
- The installation processes flashes Qi and other images
- you have to create to partitions 1=FAT 2=SWAP on your SD-Card (e.g. 2GB SD, Partition 1: FAT16, Partition 2: 128MB as swap - fdisk type 82)
- download qtm-installer-v26.zip and unpack the file on the FAT-partition of your microSD card.
- Insert microSD in your freerunner and boot from SD-Card (press Power & AUX-Button together to get boot menue)
- Select boot from microSD and after 3 automatic reboots and flashing the QtMoko is installed including Navit.
Installation
If you flash the FreeRunner with a kernel image from QtMoko, then you must install the kernel and the root file system with dfu-util.
| NOTE: You need a fully charged Freerunner for installation. |
Installation on SD card with Qi
Installing QtMoko on your microSD Card depends on the Bootloader you are using, U-Boot or Qi.
If you have Qi installed then you can install QtMoko on the SD card. This seems to be useful if you want to work with different distribution and you can change the distribution just by changing the microSD card in your FreeRunner.
| NOTE: Installation in NAND-Memory with Qi is possible without errors, but with an installed bootloader Qi the boot process will terminate (with Qi installed by Android, which is modified). Install a non-Android Qi version or u-Boot instead! |
If you use Qi, you only need an ext2 partition into your µSD Card where you uncompress the root filesystem image file qtmoko-debian-v26.tar.gz. In this case Qi Bootloader is going to look for the kernel image into the /boot directory for file named uImage-GTA02.bin .
Installation on SDHC card with u-Boot (Neo1973)
This procedure was tested only on Neo1973. The biggest disadvantage is the fact, that you will still be able to have only one distribution on the device at once. You can change the sd card, of course, or install another system to NAND flash, but you can have only one kernel flashed on device. The only advantage is more space for system.
This procedure is derived from Booting_from_SD.
Preparation of SD card
Format it as ext3 filesystem. Download kernel and rootfs from qtmoko download page
- kernel: http://sourceforge.net/projects/qtmoko/files/Neo1973/uImage-v24-gta01.bin/download
- rootfs: http://sourceforge.net/projects/qtmoko/files/Neo1973/qtmoko-debian-v24-gta01.tar.gz/download
Mount the card in your computer and cd to it. Untar the rootfs archive to your sd with following command:
tar xvpzf qtmoko-debian-v24-gta01.tar.gz
Flashing the kernel
Flash kernel to NAND.
- Hold aux and power button.
- Connect neo to computer.
- Flash the kernel (you must be root).
# dfu-util -d 0x1457:0x5119 -a kernel -R -D uImage-v24-gta01.bin
- Hold aux and power button.
- Connect neo to computer.
- Connect to u-Boot console (you must be root).
# chown uucp.uucp /dev/ttyACM0
# cu -l /dev/ttyACM0
- Check the variables.
GTA01Bv4 # printenv
- menu_x defines xth row of bootmenu, select the one you want to define.
- Edit selected boot entry (for example 5th row). Note that it's impossible to copy & paste, so you will probably have to write it all by your own.
GTA01Bv4 # setenv menu_5 Boot from SDHC: setenv bootargs root=/dev/mmcblk0p1 console=tty0 rootdelay=5 neo1973-nand:0x00040000(u-boot),0x00004000(u-boot_env),0x00200000(kernel),0x000a0000(splash)\; nand read.e 0x32000000 kernel\; bootm 0x32000000
- Check your edited entry (backslashes are not displayed anymore).
GTA01Bv4 # printenv menu_5
- Save variables.
GTA01Bv4 # saveenv
Testing
- Hold aux and power button
- Select Boot from SDHC
- If it works, you can set it as default boot procedure according to this procedure http://wiki.openmoko.org/wiki/Booting_from_SD#Autoboot_from_SDHC.
Installation in NAND Memory with u-Boot
If you have Qi or Android (with a modified Qi) installed on your Freerunner then install U-Boot again as a bootloader by downloading a U-Boot-binary on http://downloads.openmoko.org/distro/unstable/daily/ otherwise the boot process will terminate and you have to install u-Boot.
All versions of the GTA02 (Neo FreeRunner) that have been sold to the public are version 5 hardware, so look for a file with "gta02" and "v5" in the name, for example: u-boot-gta02v5-1.3.1.bin (linked U-Boot-Version from 31.Jan 2010):
sudo dfu-util -a u-boot -R -D u-boot-gta02v5-1.3.1.bin
Installation of Kernel and Root-FS NAND-Memory
Switch off your FreeRunner and press the AUX and Power-On button at the same time. Your FreeRunner is showing the following U-Boot Menu:
*** BOOT MENU (NOR) ***
  Boot
  Boot from microSD (FAT/ext2)
  Set Console to USB
  Set Console to Serial
  Reboot
  Power Off
The FreeRunner will stay in this mode for only 30 sec. Within this time you have to start dfu-util. If you want to flash the kernel image (you will need to be root on your PC) then you have to start the following command in the 30sec your see the BOOT MENU (use kernel and rootfs from http://sourceforge.net/projects/qtmoko/files/):
# for the Neo FreeRunner:
dfu-util -d 0x1d50:0x5119 -a kernel -R -D  uImage-v24.bin
and finally the root fs with this one:
# for the Neo FreeRunner:
dfu-util -d 0x1d50:0x5119 -a rootfs -R -D qtmoko-debian-v24.jffs2
Preparations on the Connected PC/Laptop
- To enable connections just by using the hostname openmoko edit the /etc/hosts and add line
192.168.0.202 openmoko
- Enable internet connection via USB Networking so that the installation of packages will be possible.
First Boot
After finishing the installation without errors you have to start the FreeRunner and calibrate the touch screen. Then you see the installed QtMoko on your device.

First Login
If you want to login to your FreeRunner set up a network connection (see USB Networking) with USB cable and start:
desktop# ssh -X -l root 192.168.0.202
The root password is empty so set it for security reason especially when you open the ssh-daemon on the WLAN network interface. Define root password as usual on a linux box with
neo# passwd
If you have established the internet connection via USB cable then update the repository data:
neo# apt-get update
If you want to check if the internet connection is available on your freerunner ping the OpenMoko web server with:
  neo# ping 88.198.93.221
  neo# ping wiki.openmoko.org
If the first ping works and the second doesn't then check the DNS server settings (see USB Networking).
Setting Time and Date
Set the time and date on from your linux box with
ssh root@openmoko "date -us @`date -u +%s`"
sync the hardware clock with the system time to make your change persist over reboots:
# hwclock --systohc
   DOES NOT WORK - no access to Hardware Clock
If you want to set the time with a NTP Client install the following package, if you have a network connection available (see USB Networking)
# apt-get install ntpdate
# ntpdate-debian
For further detail see Setting Date and Time.
Usage
Size Root File System
If you want to install e.g. Twinkle and Navit on QtMoko the size of internal NAND memory is not sufficient (Twinkle need > 100MB). By creating symbolic links some memory problems can be avoided.
NOTE: (Size Root Filesystem) Create symbolic links from root file system to SD-card to save internal memory.If some folders are symb-linked to SD-Card (with e.g. ext2 partition), e.g.
 # mkdir /media/card/share
 # mkdir /media/card/share/navit
 # ln -s /media/card/share/navit /usr/share/navit
It recommended to use an ext2-partition. After creating symb-links install software. |
Consider installing QtMoko on MircroSD instead with Qi, if you want to make use of debian applications that exceed NAND memory capacity.
Login
If you want to login to your FreeRunner set up a network connection (see USB Networking) with USB cable and start:
desktop# ssh -X -l root 192.168.0.202
or if hostname is defined in /etc/hosts
desktop# ssh -X -l root openmoko
Installation of Applications
If you want to install applications (e.g. myapplication) login on your freerunner
# apt-get install myapplication
Replace myapplication by the package name of application name you want to start, e.g. if you want to install the command line editor vim.
# apt-get install vim
Navit installation uses Festival Lite for Speech synthesis look for the following string in navit.xml:
flite -t "%s"
If you want to install e.g. the application Navit, you have to install the following packages. Navit needs and X-Server and it will run under QX.
 # apt-get install apt-utils
 # apt-get install flite
 # apt-get install unzip
The zip-package is necessary to unzip the navit-qtm.zip package.
 # cd /media/card
 # mkdir download
 # cd download
 # wget http://www.openmobile.nl/media/download_gallery/navit-qtm.zip
 # cd /
During unzip you will be asked to replace /opt/qtmoko/bin/ppp-network. This has to be done to solve problems with DNS over GPRS. Backup ppp-network file before unzipping navit-qtm.zip.
 # cp -p /opt/qtmoko/bin/ppp-network /opt/qtmoko/bin/ppp-network.bak
 # unzip /media/card/download/navit-qtm.zip
 # rm /media/card/download/navit-qtm.zip
Unzipping the file will overwrite the following files too:
 /opt/qtmoko/etc/qx/favourites.conf
 /opt/qtmoko/etc/qx/profiles.conf
| NOTE: Unzip extracts and overwrites the network settings files mentioned above. Due to this fact the usb0 MAC address changes for the USB connection to your freerunner. E.g. under Ubuntu 10.04 the new network interface for usb0 has to configure again |
Now you have to restart your Freerunner, but you can also try from the command line of your neo:
# echo 1 > /proc/sys/vm/overcommit_memory
After restart you can start Navit under QX.

Download Maps
Create a folder MapsNavit on your SD card
# mkdir /media/card/MapsNavit
The navit QT package navit-qtm.zip from http://www.openmobile.nl contains a file navit.xml that specifies the benelux map and will try to load osm_benelux.bin that should be stored as
/media/card/MapsNavit/osm_benelux.bin
If you want to use a map for another country, you can just store a downloaded Navit-Map in that folder and rename it osm_benelux.bin. If the map name should make sense, you have to edit the file navit.xml. See the Navit manual for details. You can find the navit.xml at:
# /usr/share/navit/navit.xml
Create the folder .navit in the home directory on your FR and copy navit.xml to this directory:
 # cd ~
 # mkdir .navit
 # cp /usr/share/navit/navit.xml .navit/navit.xml
If you have the editor vim installed, edit the file at line 376 approx.:
# vim ~/.navit/navit.xml
For example, if you have downloaded the file germany.bin, your mapset element should look like this:
 <!-- Mapset template for openstreetmaps -->
 <mapset enabled="yes">
   <map type="binfile" enabled="yes" data="/media/card/MapsNavit/germany.bin"/>
 </mapset>
| NOTE: Both MAPSET and MAP have to be enabled to work with the OSM-map in Navit. |

- Open Main Menu by clicking on the green Q-Topia "Q"-Box.
- Open Applications (4 Boxes, red, yellow, green, blue).
- Scroll down and open QX.
- Select Navit.
- Click on the white Paper Icon on the bottom left to open the context menu of the QX application.
- Select Launch to start Navit.
- Exit with AUX-Button without stopping navit.
VoIP
Integrated VoIP-Client
QtMoko has an integrated VoIP-Client, which would be perfect to use a SIP-Account to do free of charge mobile communication world wide. But at the moment the integrated VoIP-Client does not work, due to some strange problems in Version v24 (see QtMoko homepage for current status of development).
Android on Freerunner has an integrated SIP-Client SipDroid that has strange audio problems as well (see http://sipdroid.org ). Maybe there is an underlying problem the
- the integrated VoIP-Client of QtMoko and
- SIPdroid Audio on Android
have in common.
Twinkle/Linphone
See Twinkle for further details or the official Website http://www.twinklephone.com/
apt-get install twinkle
For installation of Twinkle your need 105MB. It would be necessary to install QtMoko on microSD.
| Error: Installation of Twinkle with apt-get stops with errors (Test: 19.11.2010) |
You can use Linphone (http://www.linphone.org) instead, which will use 83MB.
apt-get install linphone
See additional information on the OpenMoko-Linphone pages.
PIM Storage and Import
As visible on QtMoko-Wiki Syncing Calendar data is not working at the moment. Some work has be done (Thanks to mossroy), so that iCal-Files (ics) can be imported to your QtMoko calendar via a perlscript ics2qtcal.pl. Choose the current version from http://mossroy.free.fr/ics2qtcal/.
The main job of the scripts are:
- deleting old appointments in Qt-Calendar
- importing the an ics-file into the Qt-Calendar. The ics-File can be an exported calendar in an iCal File (e.g. mycalendar.ics) which is transfered to your Neo.
- import mycalendar.ics with scripts into your SQLite Database.
Install Script
The following installation script
- downloads the scripts and stores them into the directory /usr/local/bin/,
- makes them executable,
- creates a file /usr/share/applications/syncal.desktop for QX and
- creates a file /usr/local/bin/syncal for starting the synchronisation. The syncal will look like this:
#!/bin/sh
vUser="myusername"
vPWD="mypassword"
vICS1="https://www.example.org/caldav/calendar1.ics"
vICS2="https://www.example.org/caldav/calendar2.ics"
remotesync4ics2openmoko.sh -u $vUser -p $vPWD $vICSl $vICS2
Please edit the file syncal and modify the username and password for accessing ics-file on a remote groupware server, where your iCal-file is stored.
#!/bin/sh
# INSTALL SCRIPT FOR ICS2QTCAL
# ----------------------------
# Edit the following variable for a new versions
vURL="http://mossroy.free.fr/ics2qtcal/v0.4"
cd /usr/local/bin
wget "$vURL/ics2qtcal.pl"
wget "$vURL/ics2qtcal.sh"
wget "$vURL/deleteqtcalappointments.pl"
wget "$vURL/install_dependencies.sh"
wget "$vURL/remotesync4ics2openmoko.sh"
wget "$vURL/sync4ics2openmoko.sh"
sh ./install_dependencies.sh
rm ./install_dependencies.sh
chmod u+x *.sh
# insert synccal in QX-favourites and make backup of old favourites.conf
cd /opt/qtmoko/etc/qx/
cp ./favourites.conf ./favourites.conf.$$
cat ./favourites.conf.$$ | sed 's/list=/list=synccal, /g' | favourites.conf
echo "generate synccal.desktop"
vSyncCal="/usr/share/applications/synccal.desktop"
echo "[Desktop Entry]" > $vSyncCal
echo "Version=1.0" >> $vSyncCal
echo "Name=SyncCal" >> $vSyncCal
echo "Name[de]=SyncCal" >> $vSyncCal
echo "Name[fr]=SyncCal" >> $vSyncCal
echo "Comment=Syncing remote and local ics-file into Qt-Calendar." >> $vSyncCal
echo "Comment[de]=Script fuer den Import von ics-Dateien" >> $vSyncCal
echo "Exec=synccal" >> $vSyncCal
echo "Icon=synccal" >> $vSyncCal
echo "StartupNotify=true" >> $vSyncCal
echo "Terminal=false" >> $vSyncCal
echo "Type=Application" >> $vSyncCal
echo "Categories=GTK;Utility;Dialog;" >> $vSyncCal
echo "GenericName=SyncCal" >> $vSyncCal
echo "GenericName[de]=SyncCal" >> $vSyncCal
# Done synccal.desktop ----------
echo "Generate syncal"
vSyncCal="/usr/local/bin/syncal"
echo "#!/bin/sh" > $vSyncCal
echo "vUser=\"myusername\"" >> $vSyncCal
echo "vPWD=\"mypassword\"" >> $vSyncCal
echo "vICS1=\"https://www.example.org/caldav/calendar1.ics\"" >> $vSyncCal
echo "vICS2=\"https://www.example.org/caldav/calendar2.ics\"" >> $vSyncCal
echo "remotesync4ics2openmoko.sh -u $vUser -p $vPWD $vICSl $vICS2" >> $vSyncCal
chmod u+x $vSyncCal
The script adds a syncal to QX-favourites and creates a desktop-definition file
/usr/share/applications/syncal.desktop
because without the desktop-definition file an application will not be visible in QX-favourites.
Settings for Remote ICS-files
After installation you have to edit the file
/usr/local/bin/synccal
with your confidential username, password and file URL for the remote ics files. You can import more than one remote ICS-files, so 2 variables for file URLs are defined. Change that to your appropriate number of remote ICS-files. See remotesync4ics2openmoko.sh for further details. If you do not want to store the password in the script for security reasons you can use xdialog for entering the vPWD via user interface (e.g. input box).
Setting up a Groupware Server for testing
If you want to setup your own groupware server for testing on your own Linux Box, you can try CitaDel. Accessing the remote ics-file are explained on the homepage of http://www.citadel.org.
Use Evolution iCal-file via SSHFS
Evolution stores the calendar data in the iCal-file calendar.ics. So you might to use the files directly.
If you running Evolution on you Linux-Box you can use SSHFS to mount the directory of Evolution in homedirectory e.g. in
/home/username/.evolution/calendar/local/system
You can use the iCal-file directly by mounting the directory mentioned above on the Freerunner. Now you can used the calendar.ics from the Linux-Box, if you mount the directory in (replace username by your account on your Linux-Box):
/mnt/remoteics
on your Freerunner.
 # mkdir /mnt/remoteics
 # sshfs username@example.com:/home/username/.evolution/calendar/local/system /mnt/remoteics
Now you can use the file calendar.ics directly:
/mnt/remoteics/calendar.ics
The scripts of Mossroy must be modified for this, because the scripts use wget to download the ics-files.
Favorites

QtMoko Favorites
Add to Favorites
You might prefer some applications and you use them more frequent. Then you might want them to add to your favorites.
- Go the application list and select (highlight, but do not start) application.
- click on the paper icon on bottom left and select Add to Favorite.
Then you will have this Icon in the favorites menu (yellow star in main menu) too.
Delete from Favorites
A bit more difficult (i.e. more hidden in QtMoko) is to delete icons from the favorites menu.
- start Task Manager in main menu by pressing the AUX-Button on you freerunner.
- You will see the list of favorites
- Select the application your want to remove from favorites (keep pressed for a few seconds on the application until the context menu appear. The icon you want to delete should not be selected before.
- select delete from context menu and the icon disappears from favorites.
Adding QX Favourites
For adding Favourites in the X-Server environment see QX.
MP3 Audio

Directory of MP3-Files
The Media-Player will expect audio MP3-file in the directory:
/home/root/Documents/audio/mpeg
If want to store several MP3-file on your freerunner create a symbolic link of audio to your SD-card:
  neo# mkdir /media/card/audio
  neo# mkdir /media/card/audio/mpeg
  ln -s /media/card/audio /home/root/Documents/audio
Store MP3-files in /media/card/audio/mpeg
MP3-codec install
- Install codec-installer from repository
- Start codec-installer
- Install MP3-codec
- reboot you freerunner
Error Handling and Workarounds
During the installations above, the following problem occured:
Xdialog Problem with Gdk-WARNING
When encouter a GdK-Warning using Xdialog in scripts you can remove the warning with sed.
sed 's/Gdk-WARNING ... locale not supported by C library//g
This warning is part of the return string of an inputbox in xdialog.
| NOTE: This application sed is a workaround. The best solution is a modifacition that removes the GdK-warning itself. |
Embedded in a script sed will remove the warning from the input string. A example script (modified from http://xdialog.free.fr) will work like this:
  #!/bin/sh

  Xdialog --title "INPUT BOX" \
     --inputbox "Enter URL:" 18 45 \
     "http://www123.Example-Test.com" 2> /tmp/inputbox.tmp.$$

  retval=$?
  input=`cat /tmp/inputbox.tmp.$$`
  rm -f /tmp/inputbox.tmp.$$


  input=`echo $input | sed 's/Gdk-WARNING ... locale not supported by C library//g'`
  # remove invalid character from URL
  input=`echo $input | sed 's/[^a-zA-Z1-9\/:\. \-]//g'`

  case $retval in
    0)
      echo "Input string is '$input'";;
    1)
      echo "Cancel pressed.";;
    255)
      echo "Box closed.";;
  esac
To test this script on your freerunner, you have to start it from the terminal in QX. Source of the xdialog script is used from http://xdialog.free.fr.
Apt-Get Problem jffs2
[Apt-Get] (jffs2) Couldn't make mmap ...: (solved with the following workaround) If that happens regularly, create two scripts apt-start and apt-stop. These scripts are used before and after apt-get use.
Create an APT-START Script
- start vi for the script apt-start
# vi /bin/apt-start
- press "I" for insert and enter the following code:
 #!/bin/sh
 mount -t tmpfs none /var/cache/apt
 mkdir -p /var/cache/apt/archives/partial
 apt-get update
 echo "apt-get can now be used"
 echo "stop with apt-stop"
- press ESC and then ":w"
- press ":q" for quit.
- make the script executable with chmod:
chmod u+x /bin/apt-start
Create an APT-STOP Script
- start vi for the script apt-stop.
# vi /bin/apt-stop
- press "I" for insert and enter the following code:
 #!/bin/sh
 umount /var/cache/apt
 echo "Now old settings for apt-get are restored"
- press ESC and then ":w"
- press ":q" for quit.
- make the script executable with chmod:
chmod u+x /bin/apt-stop
Usage of Scripts
If you to install software use the scripts before and after apt-get call:
 apt-start
 apt-get install mysoftware
 apt-stop
Replace mysoftware with the package you want to install e.g. linphone.
Data Safety / Boot Errors
Boot Errors due to Filesystem Corruption
In case your ext3 partition gets corrupted take out the sdcard from your freerunner, put it in a card reader and insert the card reader in one of the usb slots of your desktop linux system.
Find out the mount point of the ext3 partition but do not mount the partition. You can use the following command to find the partition:
cat /proc/partitions
Now you can run from command line where /dev/sdXX is the qtmoko partition on your sd card (/dev/sdc2 in the example below):
fsck /dev/sdc2
and you will be asked to confirm the error correction. If you just want to have any errors corrected run
fsck -y /dev/sdc2
Backing up whole partitions
To backup whole partitions to your local desktop computer navigate to the directory where you'd like to have the files written to (in this case /home/limo/) open a terminal in that directory and run the two commands below (it assumes the following paritioning of the sdcard: 1st partition = vfat 2nd partition = qtmoko on some ext filesystem):
 ssh -t root@192.168.0.202 dd if=/dev/mmcblk0p1 ibs=4096 conv=notrunc,noerror | dd of=/home/limo/qtmoko_vfatpartition.img obs=4096
 ssh -t root@192.168.0.202 dd if=/dev/mmcblk0p2 ibs=4096 conv=notrunc,noerror | dd of=/home/limo/qtmoko_rootpartition.img obs=4096
or somewhat simpler do the folowing which works with busybox dd:
 ssh -t root@192.168.0.202 dd if=/dev/mmcblk0p1 bs=4096 > ~/qtmoko_vfatpartition.bs4096.img
 ssh -t root@192.168.0.202 dd if=/dev/mmcblk0p2 bs=4096 > ~/qtmoko_rootpartition.bs4096.img
Backing up your contacts
In contacts menu there is "Send All..." You can then send contacts using bluetooth or email. If you use email and you don't have smtp setup up, you can download the mail message from /home/root/Applications/qtopiamail and open in e.g. in kmail and save the VCF attachment.
Reinstallation of the contacts is much easier: After reinstall you can just click on it and QtMoko imports them. Regards
Links
SVG Keyboards (from QtMoko v45 onwards)
Since QtMoko v45 you can customize your keyboard via simple svg files which can be easily edited in inkscape. Here is the original post:
Layouts are completely customizable. You can easily change key size, position, background. It's very easy to add international characters and new layouts. Just have a look at /opt/qtmoko/etc/im/svgkbd/ The layouts are normal svg images. You can use inkscape to open and edit them. It should be very clear what to do. Only thing to explain is how you should name the key XML elements. In Inkscape go to Edit->XML editor and click on key. The element name must be in form:
key_QtKeycode_unicode
For possible QtKeycode values check this link qt-keycodes and for unicode values use your favourite unicode character map.
Manual installation
This installation will remove the original keyboards!!!
If you want to keep them backup everything in root@192.168.0.202:/opt/qtmoko/etc/im/svgkbd/
To install the keyboard download File:DE de.tar.gz, go to your download directory and use
tar xvzf DE_de.tar.gz && scp DE_de/* root@192.168.0.202:/opt/qtmoko/etc/im/svgkbd/
to replace the original keyboards with the language specific ones.
Do not forget to restart QtMoko afterwards.
DE_de Layout
This layout has a portrait and a landscape mode for the abc.svg keyboard (more a SMS keyboard now). The portrait mode is default which means that abc.svg is just a copy of abc_portrait.svg. If you prefer the landscape mode just copy the abc_landscape.svg to abc.svg.
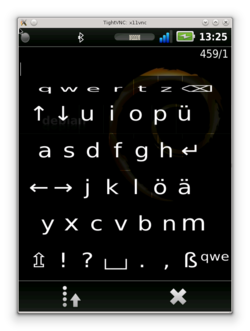
abc_portrait.svg = default abc.svg
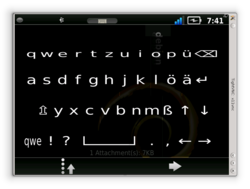
abc_landscape.svg
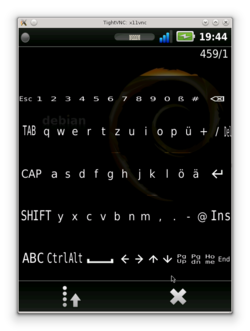
qwerty.svg
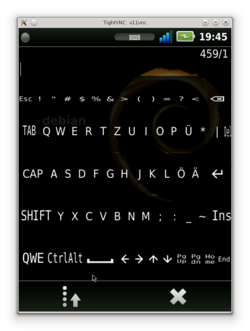
qwerty_shift.svg


Installation via Package-Manger
Radek has packaged the keyboard as a .deb package so you can simple navigate to "more apps" and look for keyboards. Do not forget to restart QtMoko afterwards.