Stylus Alternatives
From Openmoko
m (reorg) |
Tomhacohen (Talk | contribs) m (→For Sell: changed to for purchase) |
||
| (11 intermediate revisions by 8 users not shown) | |||
| Line 1: | Line 1: | ||
| − | + | Though also featuring a pen, laser pointer, and flashlight, some might | |
| + | find the stock stylus for the neo cumbersome. | ||
| − | + | A list of stylus alternatives for the Neo: | |
| − | This is an alternative | + | = DIY = |
| + | '''Electrical Wiring Mod''' | ||
| + | * This is an alternative stylus especially designed for Openmoko use: | ||
| + | [[Image:diystylus.jpg]] | ||
| + | Instructions on how to make: | ||
| − | + | First we need a a wire cutter, a plier and an electrical wire like shown in the picture: (just one of the 3) | |
| + | [[Image:electrical_wire.jpg]] | ||
| + | # Cut the wire to the wanted size. I cut mine to the size of a credit card's length + half a centimeter (because after we will finish it'll get shorter) | ||
| + | # Cut the copper as much as possible so there will be as little copper visible as possible. We only want to see the insulate, not the copper. | ||
| + | # Bend about a quarter of a centimeter from the edge with the plier so the ends of the wire will be bent plastic. | ||
| + | # Press the bent wire with the plier (it's advised to cover the wire with paper/cloth when doing so, since we don't want to expose the copper), so it'll will stick as close to the other part of the wire as possible (Again, just the edges). | ||
| + | # Do the previous step again for the other end. | ||
| + | # Voila, hopefully you got the same resultls shown in the first picture. | ||
| + | = For Purchase = | ||
| + | '''Comfort Stylus:''' | ||
| + | * This is an alternative Stylus for the Nintendo DS | ||
| + | * [http://www.comfortstylus.com/index03.jpg Image] | ||
| + | * Buy here: http://www.comfortstylus.com/ | ||
| + | '''DayDeal Stylus:''' | ||
| + | * [http://www.daydeal.com/files/images6/true_tips2.jpg Image] | ||
| + | * Buy here: http://www.daydeal.com/home.php?cat=2654 | ||
| − | http://www. | + | '''Stylus for COWON D2:''' |
| − | + | * This is the default stylus for the Cowon D2 | |
| + | * [http://www.jetmall.net/ProductImages/pic_d2_stylus.jpg Image] | ||
| + | * Buy here: http://www.jetmall.net/index.asp?PageAction=VIEWPROD&ProdID=303 | ||
| + | '''Krusell Touch Screen Pointer:''' | ||
| + | * [http://tiltsite.com/wp-content/uploads/2008/06/triforce3.jpg Image] | ||
| + | * http://www.krusell.se//products/Accessories/?category=74 | ||
| + | * [http://tiltsite.com/2008/06/krusell-touch-screen-pointer-review/ Review] | ||
| + | * Unfortunately, the thin loop on model 50142 does not fit around the bottom of the FreeRunner in a [http://en.wikipedia.org/wiki/Cow_hitch cow hitch]. | ||
| − | + | [[Pouch]] | |
| − | [[Category: | + | |
| + | [[Category:Hardware ideas]] | ||
Latest revision as of 00:05, 10 February 2009
Though also featuring a pen, laser pointer, and flashlight, some might find the stock stylus for the neo cumbersome.
A list of stylus alternatives for the Neo:
[edit] DIY
Electrical Wiring Mod
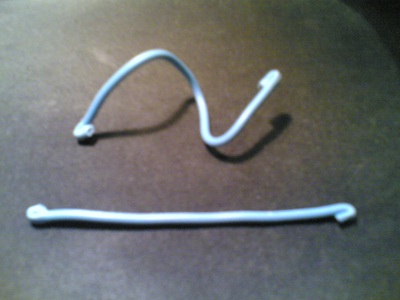
- This is an alternative stylus especially designed for Openmoko use:
Instructions on how to make:
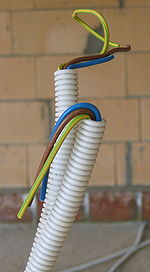
First we need a a wire cutter, a plier and an electrical wire like shown in the picture: (just one of the 3)
- Cut the wire to the wanted size. I cut mine to the size of a credit card's length + half a centimeter (because after we will finish it'll get shorter)
- Cut the copper as much as possible so there will be as little copper visible as possible. We only want to see the insulate, not the copper.
- Bend about a quarter of a centimeter from the edge with the plier so the ends of the wire will be bent plastic.
- Press the bent wire with the plier (it's advised to cover the wire with paper/cloth when doing so, since we don't want to expose the copper), so it'll will stick as close to the other part of the wire as possible (Again, just the edges).
- Do the previous step again for the other end.
- Voila, hopefully you got the same resultls shown in the first picture.
[edit] For Purchase
Comfort Stylus:
- This is an alternative Stylus for the Nintendo DS
- Image
- Buy here: http://www.comfortstylus.com/
DayDeal Stylus:
Stylus for COWON D2:
- This is the default stylus for the Cowon D2
- Image
- Buy here: http://www.jetmall.net/index.asp?PageAction=VIEWPROD&ProdID=303
Krusell Touch Screen Pointer:
- Image
- http://www.krusell.se//products/Accessories/?category=74
- Review
- Unfortunately, the thin loop on model 50142 does not fit around the bottom of the FreeRunner in a cow hitch.


