Manuals/Neo FreeRunner/it

From Openmoko

Revision as of 14:24, 15 July 2008 by Jollyr0ger (Talk | contribs)

Jump to: navigation, search


Grazie per aver comprato questa versione da Sviluppatori del Neo Freerunner. Il telefono Neo FreeRunner è la seconda piattaforma hardware che sfrutta nativamente Openmoko. Questa guida ti aiuterà a conoscere il tuo Neo Freerunner e ti indicherà come inizare ad usarlo.

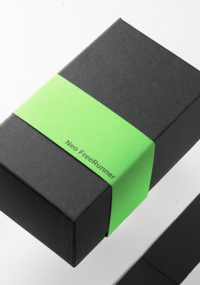
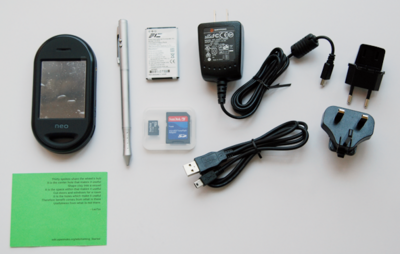
La confezione del Neo Freerunner

Contents

Contenuti della Confezione

All'interno della Confezione
Circle2.gif Neo FreeRunner
Circle2.gif Stylus
Circle2.gif Batteria
Circle2.gif Caricatore
Circle2.gif Cavo USB
Circle2.gif Scheda microSD da 512MB

Iniziare a Conoscere il Neo Freerunner

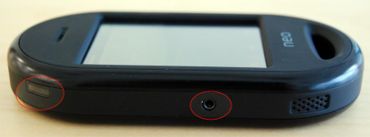
Pulsante AUX Button e jack cuffie (da sinistra a destra)
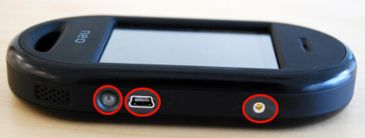
Pulsante di Accensione, porta USB ed antenna GSM esterna (da sinistra a destra)
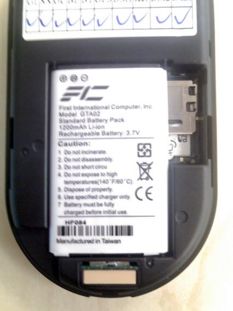
Parte posteriore
Inserisci qui la SIM e la scheda di memoria
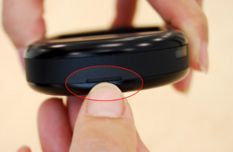
Apri il case da questo lato
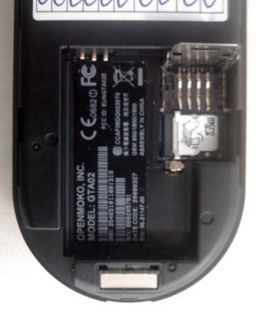
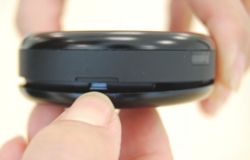
Aperto!

Inserire la scheda Micro-SD, la SIM e la Batteria

  1. Rimuovere la cover posteriore del Neo Freerunner, tenendo il dispositivo per i lati e usando l'unghia fare leva nello taglio in cima al Neo Freerunner.
  2. Ora dovreste essere in grado di riconoscere il sistema che blocca la scheda SIM e la memoria Micro-SD, al margine con lo scomparto per la batteria.
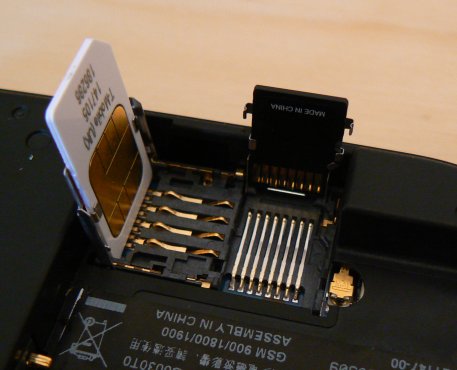
  3. Sbloccare il fissa scheda SIM facendo scivolare con l'unghia la parte metallica in giù, in direzione dell'entrata USB. Prestare attenzione poichè queste parti sono delicate e potrebbero essere danneggiate forzandole nella direzione sbagliata.
  4. Sollevare il fissa scheda SIM.
  5. La memoria Micro-SD è tenuta ferma da due fermagli su ambo i lati. E' più facile aprire il ferma Micro-SD sbloccando i fermagli uno alla volta, anzichè tirandola dal mezzo poichè tende ad aumentare la pressione sui fermagli laterali. Un cacciavite o un piccolo coltello possono aiutare in questa operazione.
  6. Inserire la memoria Micro-SD dentro all'apposito spazio. Nota che i contatti elettrici devono rivolgersi verso il basso e vicino al bordo del Neo Freerunner.
  7. Chiudere il fissa scheda Micro-SD, assicurandosi che entrambi i fermagli siano ben agganciati.
  8. Inserire la scheda SIM dentro il fissa scheda SIM, facendo attenzione a farla scivolare dentro le due linguette metalliche. Nota che i contatti metallici devono essere rivolti verso il basso e l'angolo tagliato deve essere in direzione della presa dell'antenna GPS esterna.
  9. Chiudere il blocca scheda SIM e bloccarlo facendo scivolare la parte metallica in direzione della presa per l'antenna GPS esterna del Neo Freerunner.
  10. Inserire la batteria nel compartimento per la batteria, allineando i contatti elettrici della batteria con quelli del comparto. Inserire prima il lato con i contatti elettrici.
  11. Rimettere la cover posteriore del Neo Freerunner.
SIM and SD holders open, with cards in place

Accendere il Neo Freerunner

Ricaricare il Neo Freerunner

Quando si usa il Neo Freerunner per la prima volta, bisogna caricare la batteria completamente. La batteria può essere caricata con il caricatore fornito (a 1000mA) o con una porta USB che abbia la capicità di fornire 500mA di corrente. La maggiorparte dei computer sarà in grado di caricare il Neo Freerunner senza problemi.

Caricando a 100mA ci vorranno 6-12 ore, invece a 500mA ci vorrà 1-2 ore. (openmoko.togaware.com)

Sbloccare lo Schermo

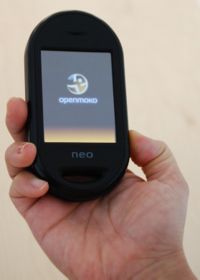
Quando lo schermo è bloccato, vedrai una grafica verde in stile Matrix con il simbolo di Openmoko nel centro della parte bassa dello schermo, assieme al simbolo di bloccato e sbloccato. Se si trascina il simbolo di Openmoko fino alla cima dello schermo, verso il simbolo di sbloccato, si sbloccherà lo schermo.

Connettere il Neo Freerunner alla Rete via USB

Connettere il Neo Freerunner a un computer GNU/Linux con il cavo USB. Per fare questo con Mac OS X, riferitevi a MacOS_X. Dopo il boot nell'immagine di Openmoko avrete una nuova interfaccia, usb0, sul vostro computer GNU/Linux.

Metodo Manuale

Digitare i seguenti comandi in un terminale GNU/Linux:

ifconfig usb0 192.168.0.200 netmask 255.255.255.0
ssh root@192.168.0.202

Premere Invio per inserire la password.

Metodo Automatico
  • Debian e derivate (Ubuntu, Sidux etc.)

Modificare il file /etc/network/interfaces:

auto usb0
iface usb0 inet static
address 192.168.0.200
netmask 255.255.255.0
  • Gentoo

Modificare il file /etc/conf.d/net:

config_usb0="192.168.0.200/24"

Riavviare i servizi di rete('/etc/init.d/networking restart' per i sistemi basati su Debian) e quindi digitare i seguenti comandi in un terminale GNU/Linux:

ssh root@192.168.0.202

Premere Invio per inserire la password.

NOTE:

Se il tuo dispositivo di rete sta usando un intervallo di ip 192.168.0.x dovrai usare il seguente comando prima di poterti connettere:

route add -host 192.168.0.202 dev usb0 


Automatizzare ancora di più le operazioni

Se non vuoi doverti ricordare l'indirizzo ip del tuo telefono, puoi creare un alias aggiungerndo la seguente riga nel file /etc/hosts:

192.168.0.202   openmoko

Ora sarà possibile connettersi al proprio telefono usando il seguente comando:

ssh root@openmoko

Il comando precedente ti fornisce solamente una connessione con una Shell sicura con il tuo dispositivo Openmoko, non ti permette di collegare il tuo dispositivo a Internet. Se ti interessa collegare il tuo dispositivo a Internet leggi alla sezione USB_Networking.

Condividere la tua connessione ad Internet via USB

In Ubuntu:

Dentro al file /etc/network/interfaces, la configurazione dell'interfaccia in questo modo:

auto usb0
iface usb0 inet static
   address 192.168.0.200
   netmask 255.255.255.0
   network 192.168.0.0
   up iptables -A POSTROUTING -t nat -j MASQUERADE -s 192.168.0.0/24 &
   up echo 1 > /proc/sys/net/ipv4/ip_forward &
   up iptables -P FORWARD ACCEPT &
   down iptables -D POSTROUTING -t nat -j MASQUERADE -s 192.168.0.0/24 &

Quindi, sul tuo Openmoko, modifica /etc/ e da così:

iface usb0 inet static
       address 192.168.0.202
       netmask 255.255.255.0
       network 192.168.0.0
       gateway 192.168.0.200
       up echo nameserver 192.168.0.200 > /etc/resolv.conf

a qualcosa che punti al nome reale del server, come un sistema publico DNS da OpenDNS, come questo:

iface usb0 inet static
       address 192.168.0.202
       netmask 255.255.255.0
       network 192.168.0.0
       gateway 192.168.0.200
       up echo nameserver 208.67.222.222 > /etc/resolv.conf
       up echo nameserver 208.67.220.220 >> /etc/resolv.conf

Modifiche all'immagine 2007.2

The stock 2007.2 image flashed onto the Neo FreeRunner after its production is really just the bare bones. For example, you don't have the clock and the quick-launch icons showing. Here's how you can change that:

# dbus-launch gconftool-2 -t boolean -s /desktop/poky/interface/reduced false
# /etc/init.d/xserver-nodm restart

If you rather have a regular clock instead of the digital one, do this instead:

# dbus-launch gconftool-2 -t boolean -s /desktop/poky/interface/reduced false
# dbus-launch gconftool-2 -t boolean -s /desktop/poky/interface/digital_clock false
# /etc/init.d/xserver-nodm restart

With either clock, you may wish to set the correct Timezone.

To test GPS, you can use agpsui:

# opkg install openmoko-agpsui

For a nice map, try tangoGPS:

# opkg install tangogps

And if you want the Media Player back:

# opkg install openmoko-mediaplayer2
# wget http://abraxa.dyndns.org:81/random/openmoko-mediaplayer-theme.tar.bz2
# tar xjf openmoko-mediaplayer-theme.tar.bz2 -C /usr/share/themes/Moko/gtk-2.0

If you want a basic image viewer, have a look at the one from the GPE suite:

# opkg install gpe-icons gpe-gallery

The web browser:

# opkg install openmoko-browser2

For a full keyboard see these instructions.

There are tons more apps you can install - check out the Repositories for a list of packages.

Effettuare il Boot sul Neo Freerunner

You can boot your Neo FreeRunner in the following ways:

Circle2.gif You can power it up into an Openmoko image directly.
Circle2.gif You can boot it into U-Boot via NAND Flash.
Circle2.gif You can boot it into U-Boot via NOR Flash.

Booting the device into NAND and NOR Flash allows you to update the kernel and root filesystem.

Avviare l'immagine Openmoko

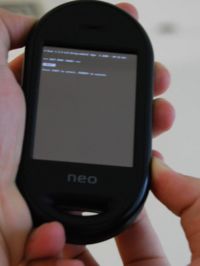
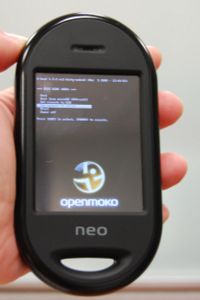
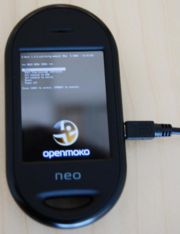
Menu2.jpg

Press and hold Power button for about 8 seconds, until the Openmoko splash screen turns up. You may now release the Power button and the Neo FreeRunner will continue to boot into the Openmoko Image.

Log into U-Boot in the NAND Flash

Menu7.jpg

Press and hold Power button, then press and hold AUX button for about 5 to 8 seconds. You should see the boot menu for the NAND Flash. Press the AUX button to select one of the options and then press the Power button to execute.

Log into U-Boot in the NOR Flash

Menu6.jpg

Press and hold the AUX button, then press and hold the Power button. Then, release the AUX button. You should see the boot menu for the NOR Flash. This option is usually used by developers or when flashing the FreeRunner. If you cannot log into U-Boot in NAND then you can log into U-Boot in the NOR Flash either.

NOTE: There are six options you can choose when you log into the NOR Flash.

1. Boot

2. Boot from MicroSD

3. Set console to USB

4. Set console to Serial

5. Reset

6. Power off


NOTE: The term Logging in used in this context means to turn on the device using the described method, and leaving it at the U-Boot menu. To avoid the device automatically booting, tap the AUX key to move the selector bar. Note also that the device will not automatically turn off while flashing is in progress.


Flashing the Neo FreeRunner

As Openmoko development continues, Openmoko regularly releases updated versions of the Openmoko root filesystem, the kernel, and the U-Boot. These may be programmed into the Flash memory of Neo FreeRunner. You can use the USB cable and Openmoko provided tool to flash Neo FreeRunner.

NOTE: The Openmoko software team builds images daily. If you want to use the latest images, you can download the image from the daily build, but we recommend you download the most stable image from http://downloads.openmoko.org/releases/Freerunner/. Images here have been tested by the test team.

More about current Images: http://wiki.openmoko.org/wiki/Latest_Images


Step1. Download the DFU-util

You can download the flashing tool from: http://downloads.openmoko.org/releases/Freerunner/dfu-util

On the GNU/Linux host you can use the following command to download the dfu-util:

wget http://downloads.openmoko.org/releases/Freerunner/dfu-util

Afterwards you have to change the rights on the file:

chmod a+x dfu-util

Step 2. Flashing the Kernel

You can download the kernel from http://downloads.openmoko.org/releases/Freerunner/

Type in the following command in the terminal on a GNU/Linux host. On some systems you need to be root before this will work.

./dfu-util -a (partion name) -R -D (download image file name)


ex:

./dfu-util -a kernel -R -D uImage-2.6.24+svnr4082-r4055-r3-neo1973.bin
Log into U-Boot in NOR Flash, connect your Neo with Linux Host via USB cable

Before you execute the command, please log into U-Boot in the NOR Flash. The Neo FreeRunner needs to be booted into U-Boot for flashing.

You will then need to connect your Neo with the GNU/Linux host via USB cable. Press Enter to execute the command. When flashing succeeds the following will be shown:

status(0) = No error condition is present
Done!

NOTE: The meaning of the parameters you specified:

-a --alt alt Specify the altsetting of the DFU interface by name or by number
-R --reset Issue USB Reset signalling once we're finished
-D --download file Write firmware from<file> into device


Step 3. Flashing the Root Filesystem

You can download the root filesystem from: http://downloads.openmoko.org/releases/Freerunner/

Type the following command in the terminal of a GNU/Linux host. On some systems you will need to be root.

./dfu-util -a rootfs -R -D openmoko-devel-image-fic-gta02.jffs2

When flashing succeeds the following will be shown:

status(0) = No error condition is present
Done!

Appendice

If you want to know more about the Neo FreeRunner then you can get more information in the following topics:

Views
Personal tools


Grazie per aver comprato questa versione da Sviluppatori del Neo Freerunner. Il telefono Neo FreeRunner è la seconda piattaforma hardware che sfrutta nativamente Openmoko. Questa guida ti aiuterà a conoscere il tuo Neo Freerunner e ti indicherà come inizare ad usarlo.

La confezione del Neo Freerunner

Contenuti della Confezione

All'interno della Confezione
Circle2.gif Neo FreeRunner
Circle2.gif Stylus
Circle2.gif Batteria
Circle2.gif Caricatore
Circle2.gif Cavo USB
Circle2.gif Scheda microSD da 512MB

Iniziare a Conoscere il Neo Freerunner

Pulsante AUX Button e jack cuffie (da sinistra a destra)
Pulsante di Accensione, porta USB ed antenna GSM esterna (da sinistra a destra)
Parte posteriore
Inserisci qui la SIM e la scheda di memoria
Apri il case da questo lato
Aperto!

Inserire la scheda Micro-SD, la SIM e la Batteria

  1. Rimuovere la cover posteriore del Neo Freerunner, tenendo il dispositivo per i lati e usando l'unghia fare leva nello taglio in cima al Neo Freerunner.
  2. Ora dovreste essere in grado di riconoscere il sistema che blocca la scheda SIM e la memoria Micro-SD, al margine con lo scomparto per la batteria.
  3. Sbloccare il fissa scheda SIM facendo scivolare con l'unghia la parte metallica in giù, in direzione dell'entrata USB. Prestare attenzione poichè queste parti sono delicate e potrebbero essere danneggiate forzandole nella direzione sbagliata.
  4. Sollevare il fissa scheda SIM.
  5. La memoria Micro-SD è tenuta ferma da due fermagli su ambo i lati. E' più facile aprire il ferma Micro-SD sbloccando i fermagli uno alla volta, anzichè tirandola dal mezzo poichè tende ad aumentare la pressione sui fermagli laterali. Un cacciavite o un piccolo coltello possono aiutare in questa operazione.
  6. Inserire la memoria Micro-SD dentro all'apposito spazio. Nota che i contatti elettrici devono rivolgersi verso il basso e vicino al bordo del Neo Freerunner.
  7. Chiudere il fissa scheda Micro-SD, assicurandosi che entrambi i fermagli siano ben agganciati.
  8. Inserire la scheda SIM dentro il fissa scheda SIM, facendo attenzione a farla scivolare dentro le due linguette metalliche. Nota che i contatti metallici devono essere rivolti verso il basso e l'angolo tagliato deve essere in direzione della presa dell'antenna GPS esterna.
  9. Chiudere il blocca scheda SIM e bloccarlo facendo scivolare la parte metallica in direzione della presa per l'antenna GPS esterna del Neo Freerunner.
  10. Inserire la batteria nel compartimento per la batteria, allineando i contatti elettrici della batteria con quelli del comparto. Inserire prima il lato con i contatti elettrici.
  11. Rimettere la cover posteriore del Neo Freerunner.
SIM and SD holders open, with cards in place

Accendere il Neo Freerunner

Ricaricare il Neo Freerunner

Quando si usa il Neo Freerunner per la prima volta, bisogna caricare la batteria completamente. La batteria può essere caricata con il caricatore fornito (a 1000mA) o con una porta USB che abbia la capicità di fornire 500mA di corrente. La maggiorparte dei computer sarà in grado di caricare il Neo Freerunner senza problemi.

Caricando a 100mA ci vorranno 6-12 ore, invece a 500mA ci vorrà 1-2 ore. (openmoko.togaware.com)

Sbloccare lo Schermo

Quando lo schermo è bloccato, vedrai una grafica verde in stile Matrix con il simbolo di Openmoko nel centro della parte bassa dello schermo, assieme al simbolo di bloccato e sbloccato. Se si trascina il simbolo di Openmoko fino alla cima dello schermo, verso il simbolo di sbloccato, si sbloccherà lo schermo.

Connettere il Neo Freerunner alla Rete via USB

Connettere il Neo Freerunner a un computer GNU/Linux con il cavo USB. Per fare questo con Mac OS X, riferitevi a MacOS_X. Dopo il boot nell'immagine di Openmoko avrete una nuova interfaccia, usb0, sul vostro computer GNU/Linux.

Metodo Manuale

Digitare i seguenti comandi in un terminale GNU/Linux:

ifconfig usb0 192.168.0.200 netmask 255.255.255.0
ssh root@192.168.0.202

Premere Invio per inserire la password.

Metodo Automatico

Modificare il file /etc/network/interfaces:

auto usb0
iface usb0 inet static
address 192.168.0.200
netmask 255.255.255.0

Modificare il file /etc/conf.d/net:

config_usb0="192.168.0.200/24"

Riavviare i servizi di rete('/etc/init.d/networking restart' per i sistemi basati su Debian) e quindi digitare i seguenti comandi in un terminale GNU/Linux:

ssh root@192.168.0.202

Premere Invio per inserire la password.

NOTE:

Se il tuo dispositivo di rete sta usando un intervallo di ip 192.168.0.x dovrai usare il seguente comando prima di poterti connettere:

route add -host 192.168.0.202 dev usb0 


Automatizzare ancora di più le operazioni

Se non vuoi doverti ricordare l'indirizzo ip del tuo telefono, puoi creare un alias aggiungerndo la seguente riga nel file /etc/hosts:

192.168.0.202   openmoko

Ora sarà possibile connettersi al proprio telefono usando il seguente comando:

ssh root@openmoko

Il comando precedente ti fornisce solamente una connessione con una Shell sicura con il tuo dispositivo Openmoko, non ti permette di collegare il tuo dispositivo a Internet. Se ti interessa collegare il tuo dispositivo a Internet leggi alla sezione USB_Networking.

Condividere la tua connessione ad Internet via USB

In Ubuntu:

Dentro al file /etc/network/interfaces, la configurazione dell'interfaccia in questo modo:

auto usb0
iface usb0 inet static
   address 192.168.0.200
   netmask 255.255.255.0
   network 192.168.0.0
   up iptables -A POSTROUTING -t nat -j MASQUERADE -s 192.168.0.0/24 &
   up echo 1 > /proc/sys/net/ipv4/ip_forward &
   up iptables -P FORWARD ACCEPT &
   down iptables -D POSTROUTING -t nat -j MASQUERADE -s 192.168.0.0/24 &

Quindi, sul tuo Openmoko, modifica /etc/ e da così:

iface usb0 inet static
       address 192.168.0.202
       netmask 255.255.255.0
       network 192.168.0.0
       gateway 192.168.0.200
       up echo nameserver 192.168.0.200 > /etc/resolv.conf

a qualcosa che punti al nome reale del server, come un sistema publico DNS da OpenDNS, come questo:

iface usb0 inet static
       address 192.168.0.202
       netmask 255.255.255.0
       network 192.168.0.0
       gateway 192.168.0.200
       up echo nameserver 208.67.222.222 > /etc/resolv.conf
       up echo nameserver 208.67.220.220 >> /etc/resolv.conf

Modifiche all'immagine 2007.2

The stock 2007.2 image flashed onto the Neo FreeRunner after its production is really just the bare bones. For example, you don't have the clock and the quick-launch icons showing. Here's how you can change that:

# dbus-launch gconftool-2 -t boolean -s /desktop/poky/interface/reduced false
# /etc/init.d/xserver-nodm restart

If you rather have a regular clock instead of the digital one, do this instead:

# dbus-launch gconftool-2 -t boolean -s /desktop/poky/interface/reduced false
# dbus-launch gconftool-2 -t boolean -s /desktop/poky/interface/digital_clock false
# /etc/init.d/xserver-nodm restart

With either clock, you may wish to set the correct Timezone.

To test GPS, you can use agpsui:

# opkg install openmoko-agpsui

For a nice map, try tangoGPS:

# opkg install tangogps

And if you want the Media Player back:

# opkg install openmoko-mediaplayer2
# wget http://abraxa.dyndns.org:81/random/openmoko-mediaplayer-theme.tar.bz2
# tar xjf openmoko-mediaplayer-theme.tar.bz2 -C /usr/share/themes/Moko/gtk-2.0

If you want a basic image viewer, have a look at the one from the GPE suite:

# opkg install gpe-icons gpe-gallery

The web browser:

# opkg install openmoko-browser2

For a full keyboard see these instructions.

There are tons more apps you can install - check out the Repositories for a list of packages.

Effettuare il Boot sul Neo Freerunner

You can boot your Neo FreeRunner in the following ways:

Circle2.gif You can power it up into an Openmoko image directly.
Circle2.gif You can boot it into U-Boot via NAND Flash.
Circle2.gif You can boot it into U-Boot via NOR Flash.

Booting the device into NAND and NOR Flash allows you to update the kernel and root filesystem.

Avviare l'immagine Openmoko

Menu2.jpg

Press and hold Power button for about 8 seconds, until the Openmoko splash screen turns up. You may now release the Power button and the Neo FreeRunner will continue to boot into the Openmoko Image.

Log into U-Boot in the NAND Flash

Menu7.jpg

Press and hold Power button, then press and hold AUX button for about 5 to 8 seconds. You should see the boot menu for the NAND Flash. Press the AUX button to select one of the options and then press the Power button to execute.

Log into U-Boot in the NOR Flash

Menu6.jpg

Press and hold the AUX button, then press and hold the Power button. Then, release the AUX button. You should see the boot menu for the NOR Flash. This option is usually used by developers or when flashing the FreeRunner. If you cannot log into U-Boot in NAND then you can log into U-Boot in the NOR Flash either.

NOTE: There are six options you can choose when you log into the NOR Flash.

1. Boot

2. Boot from MicroSD

3. Set console to USB

4. Set console to Serial

5. Reset

6. Power off


NOTE: The term Logging in used in this context means to turn on the device using the described method, and leaving it at the U-Boot menu. To avoid the device automatically booting, tap the AUX key to move the selector bar. Note also that the device will not automatically turn off while flashing is in progress.


Flashing the Neo FreeRunner

As Openmoko development continues, Openmoko regularly releases updated versions of the Openmoko root filesystem, the kernel, and the U-Boot. These may be programmed into the Flash memory of Neo FreeRunner. You can use the USB cable and Openmoko provided tool to flash Neo FreeRunner.

NOTE: The Openmoko software team builds images daily. If you want to use the latest images, you can download the image from the daily build, but we recommend you download the most stable image from http://downloads.openmoko.org/releases/Freerunner/. Images here have been tested by the test team.

More about current Images: http://wiki.openmoko.org/wiki/Latest_Images


Step1. Download the DFU-util

You can download the flashing tool from: http://downloads.openmoko.org/releases/Freerunner/dfu-util

On the GNU/Linux host you can use the following command to download the dfu-util:

wget http://downloads.openmoko.org/releases/Freerunner/dfu-util

Afterwards you have to change the rights on the file:

chmod a+x dfu-util

Step 2. Flashing the Kernel

You can download the kernel from http://downloads.openmoko.org/releases/Freerunner/

Type in the following command in the terminal on a GNU/Linux host. On some systems you need to be root before this will work.

./dfu-util -a (partion name) -R -D (download image file name)


ex:

./dfu-util -a kernel -R -D uImage-2.6.24+svnr4082-r4055-r3-neo1973.bin
Log into U-Boot in NOR Flash, connect your Neo with Linux Host via USB cable

Before you execute the command, please log into U-Boot in the NOR Flash. The Neo FreeRunner needs to be booted into U-Boot for flashing.

You will then need to connect your Neo with the GNU/Linux host via USB cable. Press Enter to execute the command. When flashing succeeds the following will be shown:

status(0) = No error condition is present
Done!

NOTE: The meaning of the parameters you specified:

-a --alt alt Specify the altsetting of the DFU interface by name or by number
-R --reset Issue USB Reset signalling once we're finished
-D --download file Write firmware from<file> into device


Step 3. Flashing the Root Filesystem

You can download the root filesystem from: http://downloads.openmoko.org/releases/Freerunner/

Type the following command in the terminal of a GNU/Linux host. On some systems you will need to be root.

./dfu-util -a rootfs -R -D openmoko-devel-image-fic-gta02.jffs2

When flashing succeeds the following will be shown:

status(0) = No error condition is present
Done!

Appendice

If you want to know more about the Neo FreeRunner then you can get more information in the following topics:
Tools