Manuals/Neo FreeRunner/eu
From Openmoko
| Line 1: | Line 1: | ||
{{Languages|Manuals/Neo FreeRunner}} | {{Languages|Manuals/Neo FreeRunner}} | ||
| − | |||
Mila esker Neo FreeRunner erosteagatik. [[Neo FreeRunner]] telefonoa Openmokorako pentsatutako bigarren hardware plataforma da. Gida honetan hasierako erabilerarako behar duzuna eta tresna berria ezagutzen ikasiko duzu. | Mila esker Neo FreeRunner erosteagatik. [[Neo FreeRunner]] telefonoa Openmokorako pentsatutako bigarren hardware plataforma da. Gida honetan hasierako erabilerarako behar duzuna eta tresna berria ezagutzen ikasiko duzu. | ||
| − | |||
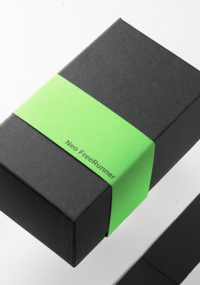
[[Image:Freerunner box.png|200px|thumb|Neo FreeRunner Package]] | [[Image:Freerunner box.png|200px|thumb|Neo FreeRunner Package]] | ||
== Hardwarearen konfigurazioa, Neo Freerunnerra eta bere osagaiak ezagutzen hasi == | == Hardwarearen konfigurazioa, Neo Freerunnerra eta bere osagaiak ezagutzen hasi == | ||
| + | |||
=== Mikro-SD txartelaren, SIM Txartelaren eta bateriaren instalazioa === | === Mikro-SD txartelaren, SIM Txartelaren eta bateriaren instalazioa === | ||
| − | + | ||
| + | * Neo Freerunnerraren atzeko tapa kendu, horretarako, alboetatik heldu telefonoa, eta goian daukan arteka edo zirrikituan azkazalen laguntzaz atzerantz bultza eta atzeko tapa askatuko da. | ||
| + | |||
<table width="80%" style="clear: both; border: 1px solid #ffffff; border-collapse: collapse; padding: 0.2em; margin: 0; font-size: 100%; margin: 0 1px;"> | <table width="80%" style="clear: both; border: 1px solid #ffffff; border-collapse: collapse; padding: 0.2em; margin: 0; font-size: 100%; margin: 0 1px;"> | ||
<tr valign="top" style="background: #ffffff"> | <tr valign="top" style="background: #ffffff"> | ||
| Line 62: | Line 63: | ||
|} | |} | ||
| + | |||
| + | |||
| + | |||
| + | ===Charging the Neo FreeRunner=== | ||
| + | |||
| + | Before using the Neo FreeRunner for the first time, you should charge the battery completely. The battery can be charged using the provided charger at 1000mA or from a powered USB port capable of providing 500mA worth of current. Most computers will be able to charge the FreeRunner without any problems. | ||
| + | |||
| + | Neo FreeRunner '''does NOT charge when powered off''', so be sure to turn it on and allow it to boot all the way to the GUI (Graphical User Interface). This should happen automatically when you plug in USB power, either from a computer or the provided charger. If it does not, you can turn the power on manually by pressing and holding the power button, which is located just below the USB jack. | ||
| + | |||
| + | Although the provided charger is rated at 2A, the maximum charge rate of the Neo FreeRunner is 1A, and thus the charge rate with the charger is less than the charger capacity. | ||
| + | |||
| + | The provided charger includes three "national" plugs. The default is North America, with alternative U.K (3 square pins) and Euro (two round pins) adapters. To install the alternative power adapters, depress the latch in the cover (on the opposite side of the charger from the product information label) and slide the cover outward. Note that the two North American pins do not come out; the other adapters slide over them, and snap into place. The two-pin Euro adapter is removed in the same way as the cover. The three-pin U.K. adapter is removed by '''gently''' pressing the dummy ground pin (black) '''toward the end of the adapter with the cord''' and then sliding it off the adapter. | ||
| + | |||
| + | Charging an empty battery at 100mA takes 12~15 hours *), at 500mA (PC) takes 2~3 hours, and at 1000mA (wallcharger) takes 1.5~3hours. (90%~100%) <br>*) charging with 100mA will occur only if device is suspended, as otherwise system takes more power than the 100mA provided by USB power source, and your battery never reaches full capacity or even drains slowly. | ||
| + | |||
| + | {{Note|See [[Neo_FreeRunner_Hardware_Issues|Neo FreeRunner Hardware Issues]] about not allowing the battery to discharge completely.}} | ||
| + | |||
| + | ===Buttons and connectors=== | ||
| + | |||
| + | <table width="80%" style="clear: both; border-collapse: collapse" valign="top"> | ||
| + | <tr> | ||
| + | <td style="width: 25px"> </td> | ||
| + | <td style="width: 370px">[[Image:menu9.jpg|370px|thumb|Power Button, USB and external GPS Antenna (left to right)|center]]</td> | ||
| + | <td style="width: 25px"> </td> | ||
| + | <td style="width: 370px">[[Image:menu8.jpg|370px|thumb|AUX Button and headset jack (left to right)|center]]</td> | ||
| + | </tr> | ||
| + | <tr> | ||
| + | <td></td> | ||
| + | <td>'''Power''' | ||
| + | Tapping the power button suspends the GTA02. | ||
| + | |||
| + | Holding the power button shutsdown the device.</td> | ||
| + | <td></td> | ||
| + | <td>'''Aux''' | ||
| + | Tapping or holding the Aux button locks the screen. | ||
| + | </td> | ||
| + | </tr> | ||
| + | </table> | ||
| + | |||
| + | '''Phone Jack''' | ||
| + | |||
| + | The phone jack is a 2.5mm connector with four contacts: stereo + MIC. It is compatible with the headsets used by Motorola smartphones (A780,A1200, ...) and the V-360. | ||
| + | |||
| + | More information on [[Headset]] page. | ||
| + | |||
| + | |||
| + | |||
| + | ===Identifying which revision you have=== | ||
| + | You will want to determine which revision of the phone you have | ||
| + | |||
| + | * remember your date code, the bottom of your shipping box should have a sticker stating it. | ||
| + | * read [[Finding_hardware_revision]] | ||
| + | |||
| + | These two are important, as they allow you to know which image is flashed on your phone at the factory (c.f. [[Distributions]] and [[GTA02_revisions | Neo FreeRunner (aka GTA02) revisions]]). | ||
| + | |||
| + | ==Software installation== | ||
| + | |||
| + | Almost all of the software on the Neo FreeRunner can be updated, including the bootloader which is needed to power up the device and the software on the GSM chip. | ||
| + | |||
| + | By default, the Neo FreeRunner comes with a default [[Distributions| distribution]] flashed in, so you should not need the following yet. Go read [[Om_2008 | OM 2008]] [[Manuals/Om_2008|manual]] to start with your phone right now. You will probably flash your phone later to switch to a newer and actively maintained [[Distributions| distribution]]. | ||
| + | |||
| + | ===Installing a bootloader=== | ||
| + | |||
| + | The bootloader is needed to start up the operating system on the phone. Qi is the recommended bootloader for the Neo FreeRunner. Installing it will result in faster booting. If you want to have multiple operating systems on your phone you should still stick with U-Boot, which is the older bootloader. You can download a bootloader from http://downloads.openmoko.org/distro/testing/NeoFreerunner/ and install it using the program [[NeoTool]] on your Linux PC. (See http://wiki.openmoko.org/wiki/No_Linux if you do not have Linux on your PC) | ||
| + | |||
| + | ===Updating the GSM Firmware=== | ||
| + | |||
| + | The current version of the GSM Firmware is called Moko 11. If you do not have this version installed yet you should do an upgrade, which will fix several issues related to the phone functionality of the FreeRunner. | ||
| + | |||
| + | <!---THIS SECTION SHOULD NOT BE EDITED HERE BUT ONLY REGULARLY COPIED FROM GSM/Flashing !!!!---> | ||
| + | |||
| + | This works by starting the FreeRunner from a system installed on the uSD, which will automatically apply all needed instructions to flash the GSM firmware to the chip. The uSD image will have to be written on a uSD, which will overwrite all its content, so as to make sure it is repartitioned correctly and that it contains the correct bootable system. | ||
| + | The procedure has proven to do a reliable job on flashing MOKO11 to GTA02. Chances anything fails are minimal if you _strictly_ follow the instructions. There's no way to do any harm to your device by using this method. | ||
| + | |||
| + | '''Take special care though about the destination of `dd`, it has to be the *physical* device (e.g. foo0) of your uSD-card, *not* any partition (e.g. foo0p1). Also make sure there are *no* mounted partitions left on the uSD when starting `dd`!'''<br> | ||
| + | ''Triple-check you are not accidentally overwriting your system-HD, by e.g using /dev/sda instead of /dev/sdc! Double-check once more! This is the one-typo-kills-system case ;-) You've been warned.'' | ||
| + | |||
| + | <ol> | ||
| + | <li>Download and <tt>untar</tt> http://people.openmoko.org/joerg/calypso_moko_FW/moko11/flash-moko11_uSD-image.tar.gz on your desktop computer. Read the <tt>README.tx</tt> file that came with the tarball.</li> | ||
| + | |||
| + | <li>Insert a uSD to your computer's reader, and unmount all uSD-partitions that might have been automounted (use <tt>mount</tt> or <tt>df -h</tt> to check). Do not use "safely remove" for this.</li> | ||
| + | |||
| + | <li>Use <tt>dd</tt> to write the image <tt>flash-moko11-2.image</tt> to the '''physical'''(!) uSD-device (this will erase all data from your uSD, including previous partition table and partitions! ''It will as well erase all data from your computer's HD, in case you accidentally `dd` to this device instead of uSD''). Log in as root or use sudo to get root privileges needed to write to the uSD card. For example:</li> | ||
| + | |||
| + | % sudo dd if=flash-moko11-2.image of=/dev/mmcblk0 | ||
| + | |||
| + | <li>Execute <tt>sync</tt> or <tt>eject <device></tt> to make sure everything is flushed to the uSD before physically removing it from the reader.</li> | ||
| + | |||
| + | <li>Insert the uSD to your FreeRunner, boot from '''[[Booting_the_Neo_FreeRunner#Log_into_U-Boot_in_the_NOR_Flash|NOR-U-Boot]]''' and select the "Boot from microSD" option.</li> | ||
| + | |||
| + | <li>See the boot and flashing process happen, and wait until a green "d_o_n_e" message shows on screen (takes some 6 min). You may can now remove the uSD or login via ssh and use <tt>mickeyterm</tt> to access the modem and check the firmware version is indeed moko11. Right after flashing, pressing the power button will suspend/resume the Neo, but ''not'' shut it down. If you want to do so, you can either remove the battery by hand, or (more gentle way) log in as root into it through the USB cable (root password is blank), and issue:</li> | ||
| + | |||
| + | # shutdown -h now | ||
| + | </ol> | ||
| + | ====NOTE==== | ||
| + | |||
| + | If you don't have a uSD reader on your PC, you can <tt>dd</tt> from the Neo: install <tt>task-base-smbfs</tt>, u(n)mount <tt>/media/card</tt>, mount the directory in which you have the <tt>flash-moko11-2.image</tt> file and do the <tt>dd</tt> stuff. This will take about 12 minutes. | ||
| + | |||
| + | You can speed this up by re-gziping just the image file and using the following command to decompress it directly to the flash card: | ||
| + | |||
| + | % gzip -d < flash-moko11-2.image.gz > /dev/mmcblk0 | ||
| + | |||
| + | Using this gzip method, you can actually do the update with an in place image as long as it is shell enabled and has 92M free on the main file system (all but Android and Neovento right now). Just get the 92M gzip file to the phone, use the above line to extract it to the card after unmounting. | ||
| + | |||
| + | Or, maybe in a more simpler manner: | ||
| + | root@om-gta02 ~ $ umount /media/card | ||
| + | and then from desktop: | ||
| + | scp flash-moko11-2.image root@192.168.0.202:/dev/mmcblk0 | ||
| + | |||
| + | ====NOTE 2==== | ||
| + | |||
| + | Whether you have [[Qi]] installed or not (see above) as your boot loader, you must power up to the NoR menu (Hold AUX Key, press Power button) and select "Boot from microSD (fat/ext2)" to begin the installation process (per DocScrutinizer in #openmoko). '''Do not''' let Qi boot the uSD. Although it still seems to flash OK, the green "d_o_n_e" does not show up, to give you the warm feeling that everything is OK. | ||
| + | |||
| + | You can confirm the firmware version number using the [[OpenmokoFramework/mickeyterm|mickeyterm]] (cmd: "AT+CGMR"). In SHR-Settings, Phone/Modem Information will supply the same number. | ||
| + | |||
| + | ===Installing a distribution=== | ||
| + | |||
| + | This section describes how to install a distribution on the internal flash memory of the Neo FreeRunner. If you want to install it on the memory card please refer to the guide provided by the distribution. | ||
| + | |||
| + | For installing a new distribution you will need two files, a root file system (rootfs) image and a kernel image. The root file system image usually ends with ".jffs2", and the kernel image ends with ".uimage.bin". You can get these files from http://wiki.openmoko.org/wiki/Download . Use the program NeoTool to install the distribution on your FreeRunner. The flashing process can take up to 15 minutes for a ~70MB image. It is also wise to make sure that your Neo has enough battery charge prior to flashing. | ||
| + | |||
| + | When flashing succeeds the following will be shown: | ||
| + | |||
| + | <pre> | ||
| + | status(0) = No error condition is present | ||
| + | Done! | ||
| + | </pre> | ||
| + | |||
| + | [[Category:Manuals]] | ||
Revision as of 20:17, 20 January 2010
| Languages: |
English • العربية • Български • Česky • Dansk • Deutsch • Esperanto • Eesti • Español • فارسی • Suomi • Français • עברית • Magyar • Italiano • 한국어 • Nederlands • Norsk (bokmål) • Polski • Português • Română • Русский • Svenska • Slovenčina • Українська • 中文(中国大陆) • 中文(台灣) • Euskara • Català |
Mila esker Neo FreeRunner erosteagatik. Neo FreeRunner telefonoa Openmokorako pentsatutako bigarren hardware plataforma da. Gida honetan hasierako erabilerarako behar duzuna eta tresna berria ezagutzen ikasiko duzu.
Contents |
Hardwarearen konfigurazioa, Neo Freerunnerra eta bere osagaiak ezagutzen hasi
Mikro-SD txartelaren, SIM Txartelaren eta bateriaren instalazioa
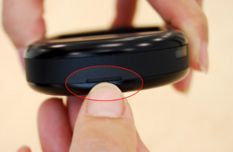
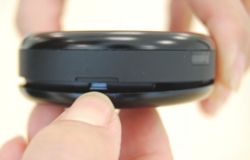
- Neo Freerunnerraren atzeko tapa kendu, horretarako, alboetatik heldu telefonoa, eta goian daukan arteka edo zirrikituan azkazalen laguntzaz atzerantz bultza eta atzeko tapa askatuko da.
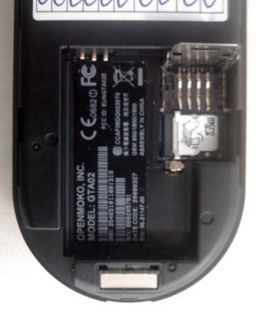
- Orain bateria jarri behar den kokagunea agerian dago, eta bere azpian telefoniako txartela eta Mikro SD txartela jartzeko guneak ere ikusiko dituzu.
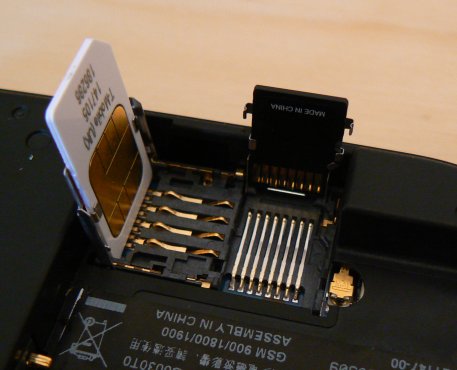
- Lehendabizi SIM txartelaren estalkia askatu behar da, horretarako, beherantz (kanpoko USB entxufe alderantz) bultza metalezko klipa. Kontu handiz ibili, zati delikatua baita hau, eta indarrez eginez gero kalteak eragin daitezke. Norantza ere arretaz aztertu.
- Altxa SIM txartela eusteko klipa.
- Mikro-SD txartelak erabili aurretik begiratu onartzen direla jakina den Mikro-SD txartelen zerrenda.
- Mikro-SD euskarria bi aldetatik lotuta dago, Errazena alda bakoitza banaka askatzea da. Erditik tiraz bi aldeak batera askatzen saituz gero, loturak indar handiagoa egiten du, beraz, lehendabizi alde bat askatu eta gero bestea. Kontuz labanekin edota bihurkinekin! honako argazkietan ikus daiteke euskarria irekita eta txartelak sartuta.
- Sartu Mikro-SD txartela bere euskarrian. Kontuan izan euskarrian txartela eusteko kartolatxoak (eusteko topeak) daudela, kartola horien artetik sartu txartela (tente geratuko da txartela, kontaktuak beheko aldean) eta ondoren itxi euskarria txartela etzanda gera dadin. Txartelaren kontaktuak beheko aldean geratu beharko dute, alegia ez dira ikusiko, eta gainera telefonoaren ertzean egongo dira.
- Mikro-SD txartelaren euskarria etzan ondoren, bi lokailuak ondo itxi dirala ziurtatu. Gaizki itxitako euskarriko txartela ez du ikusiko telefonoak.
- SIM txartela bere euskarrian sartu, kontu izan honek ere metalezko bi kartolatxo dauzkala, eta horien artean sartu behar dela.Berriz ere kontaktu elektrikoak beheruntz geratu behar dute, eta ebakitako ertza Freerunner gailuaren kanpo aldetik gertu geratu behar du (GPS antenaren aldean).
- Etzan SIM txartelaren euskarria eta metalezko klipa GPS antenaren aldera labaindu ondo itxita gera dadin.
- Sartu bateria horretarako gunean, bateriaren kontaktuak telefonoaren kontaktuekin elkartuz. Lehendabizi kontaktuen aldea sartu.
- Freerunnerraren atzeko tapa bere tokian jarri.
| Tips |
|---|
|
Bideotxoa ere ikus dezakezu. Neo gailuaren bertsio zaharrarekin egina den arren, antzeko prozesua da. |
Charging the Neo FreeRunner
Before using the Neo FreeRunner for the first time, you should charge the battery completely. The battery can be charged using the provided charger at 1000mA or from a powered USB port capable of providing 500mA worth of current. Most computers will be able to charge the FreeRunner without any problems.
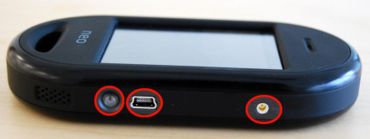
Neo FreeRunner does NOT charge when powered off, so be sure to turn it on and allow it to boot all the way to the GUI (Graphical User Interface). This should happen automatically when you plug in USB power, either from a computer or the provided charger. If it does not, you can turn the power on manually by pressing and holding the power button, which is located just below the USB jack.
Although the provided charger is rated at 2A, the maximum charge rate of the Neo FreeRunner is 1A, and thus the charge rate with the charger is less than the charger capacity.
The provided charger includes three "national" plugs. The default is North America, with alternative U.K (3 square pins) and Euro (two round pins) adapters. To install the alternative power adapters, depress the latch in the cover (on the opposite side of the charger from the product information label) and slide the cover outward. Note that the two North American pins do not come out; the other adapters slide over them, and snap into place. The two-pin Euro adapter is removed in the same way as the cover. The three-pin U.K. adapter is removed by gently pressing the dummy ground pin (black) toward the end of the adapter with the cord and then sliding it off the adapter.
Charging an empty battery at 100mA takes 12~15 hours *), at 500mA (PC) takes 2~3 hours, and at 1000mA (wallcharger) takes 1.5~3hours. (90%~100%)
*) charging with 100mA will occur only if device is suspended, as otherwise system takes more power than the 100mA provided by USB power source, and your battery never reaches full capacity or even drains slowly.
| NOTE: See Neo FreeRunner Hardware Issues about not allowing the battery to discharge completely. |
Buttons and connectors
| Power
Tapping the power button suspends the GTA02. Holding the power button shutsdown the device. |
Aux
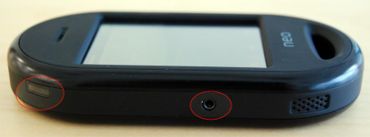
Tapping or holding the Aux button locks the screen. |
Phone Jack
The phone jack is a 2.5mm connector with four contacts: stereo + MIC. It is compatible with the headsets used by Motorola smartphones (A780,A1200, ...) and the V-360.
More information on Headset page.
Identifying which revision you have
You will want to determine which revision of the phone you have
- remember your date code, the bottom of your shipping box should have a sticker stating it.
- read Finding_hardware_revision
These two are important, as they allow you to know which image is flashed on your phone at the factory (c.f. Distributions and Neo FreeRunner (aka GTA02) revisions).
Software installation
Almost all of the software on the Neo FreeRunner can be updated, including the bootloader which is needed to power up the device and the software on the GSM chip.
By default, the Neo FreeRunner comes with a default distribution flashed in, so you should not need the following yet. Go read OM 2008 manual to start with your phone right now. You will probably flash your phone later to switch to a newer and actively maintained distribution.
Installing a bootloader
The bootloader is needed to start up the operating system on the phone. Qi is the recommended bootloader for the Neo FreeRunner. Installing it will result in faster booting. If you want to have multiple operating systems on your phone you should still stick with U-Boot, which is the older bootloader. You can download a bootloader from http://downloads.openmoko.org/distro/testing/NeoFreerunner/ and install it using the program NeoTool on your Linux PC. (See http://wiki.openmoko.org/wiki/No_Linux if you do not have Linux on your PC)
Updating the GSM Firmware
The current version of the GSM Firmware is called Moko 11. If you do not have this version installed yet you should do an upgrade, which will fix several issues related to the phone functionality of the FreeRunner.
This works by starting the FreeRunner from a system installed on the uSD, which will automatically apply all needed instructions to flash the GSM firmware to the chip. The uSD image will have to be written on a uSD, which will overwrite all its content, so as to make sure it is repartitioned correctly and that it contains the correct bootable system.
The procedure has proven to do a reliable job on flashing MOKO11 to GTA02. Chances anything fails are minimal if you _strictly_ follow the instructions. There's no way to do any harm to your device by using this method.
Take special care though about the destination of `dd`, it has to be the *physical* device (e.g. foo0) of your uSD-card, *not* any partition (e.g. foo0p1). Also make sure there are *no* mounted partitions left on the uSD when starting `dd`!
Triple-check you are not accidentally overwriting your system-HD, by e.g using /dev/sda instead of /dev/sdc! Double-check once more! This is the one-typo-kills-system case ;-) You've been warned.
- Download and untar http://people.openmoko.org/joerg/calypso_moko_FW/moko11/flash-moko11_uSD-image.tar.gz on your desktop computer. Read the README.tx file that came with the tarball.
- Insert a uSD to your computer's reader, and unmount all uSD-partitions that might have been automounted (use mount or df -h to check). Do not use "safely remove" for this.
- Use dd to write the image flash-moko11-2.image to the physical(!) uSD-device (this will erase all data from your uSD, including previous partition table and partitions! It will as well erase all data from your computer's HD, in case you accidentally `dd` to this device instead of uSD). Log in as root or use sudo to get root privileges needed to write to the uSD card. For example:
- Execute sync or eject <device> to make sure everything is flushed to the uSD before physically removing it from the reader.
- Insert the uSD to your FreeRunner, boot from NOR-U-Boot and select the "Boot from microSD" option.
- See the boot and flashing process happen, and wait until a green "d_o_n_e" message shows on screen (takes some 6 min). You may can now remove the uSD or login via ssh and use mickeyterm to access the modem and check the firmware version is indeed moko11. Right after flashing, pressing the power button will suspend/resume the Neo, but not shut it down. If you want to do so, you can either remove the battery by hand, or (more gentle way) log in as root into it through the USB cable (root password is blank), and issue:
% sudo dd if=flash-moko11-2.image of=/dev/mmcblk0
# shutdown -h now
NOTE
If you don't have a uSD reader on your PC, you can dd from the Neo: install task-base-smbfs, u(n)mount /media/card, mount the directory in which you have the flash-moko11-2.image file and do the dd stuff. This will take about 12 minutes.
You can speed this up by re-gziping just the image file and using the following command to decompress it directly to the flash card:
% gzip -d < flash-moko11-2.image.gz > /dev/mmcblk0
Using this gzip method, you can actually do the update with an in place image as long as it is shell enabled and has 92M free on the main file system (all but Android and Neovento right now). Just get the 92M gzip file to the phone, use the above line to extract it to the card after unmounting.
Or, maybe in a more simpler manner:
 root@om-gta02 ~ $ umount /media/card
and then from desktop:
 scp flash-moko11-2.image root@192.168.0.202:/dev/mmcblk0
NOTE 2
Whether you have Qi installed or not (see above) as your boot loader, you must power up to the NoR menu (Hold AUX Key, press Power button) and select "Boot from microSD (fat/ext2)" to begin the installation process (per DocScrutinizer in #openmoko). Do not let Qi boot the uSD. Although it still seems to flash OK, the green "d_o_n_e" does not show up, to give you the warm feeling that everything is OK.
You can confirm the firmware version number using the mickeyterm (cmd: "AT+CGMR"). In SHR-Settings, Phone/Modem Information will supply the same number.
Installing a distribution
This section describes how to install a distribution on the internal flash memory of the Neo FreeRunner. If you want to install it on the memory card please refer to the guide provided by the distribution.
For installing a new distribution you will need two files, a root file system (rootfs) image and a kernel image. The root file system image usually ends with ".jffs2", and the kernel image ends with ".uimage.bin". You can get these files from http://wiki.openmoko.org/wiki/Download . Use the program NeoTool to install the distribution on your FreeRunner. The flashing process can take up to 15 minutes for a ~70MB image. It is also wise to make sure that your Neo has enough battery charge prior to flashing.
When flashing succeeds the following will be shown:
status(0) = No error condition is present
Done!

