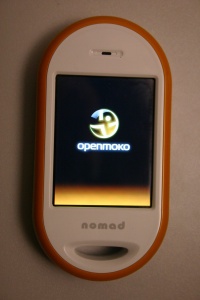
Manuals/Neo 1973/de
From Openmoko
(→While in bootloader mode, or if the phone has crashed: translation) |
|||
| Line 15: | Line 15: | ||
=== Das Telefon ausschalten === | === Das Telefon ausschalten === | ||
| − | ==== | + | ==== Im Bootloader Modus oder wenn das Telefon abgestürzt ist ==== |
| − | + | Wenn Sie den Power Button 9 Sekunden lange gedrückt halten schaltet das Telefon aus. Sichtbar wird das ausschalten durch das ausgehen der Hintergrundbeleuchtung. | |
==== While running a full linux system with userspace ==== | ==== While running a full linux system with userspace ==== | ||
Revision as of 15:48, 14 March 2007
Ein Guide welcher Ihnen das in Betrieb nehmen des Neo1973 erleichtert
Contents |
Hardware
Einlegen der Batterie
Zustätzliche Informationen im Beitrag -> Disassembling Neo1973.
Das Telefon einschalten
Das drücken des Power Buttons (abhängig von Ihrer u-boot Version muss der Button >= 5 Sekunden gedrückt werden) wird den Boot Loader laden, danach den Kernel booten und in X/GPE gehen.
Wenn Sie den Power Button ausreichend lange gedrück haben wird vom Vibrationsmodul ein leichter Impuls zu spüren sein und die Hintergrundbeleuchtung angehen. Sie können nun den Button loslassen und dem Telefon beim booten zusehen.
Das Telefon ausschalten
Im Bootloader Modus oder wenn das Telefon abgestürzt ist
Wenn Sie den Power Button 9 Sekunden lange gedrückt halten schaltet das Telefon aus. Sichtbar wird das ausschalten durch das ausgehen der Hintergrundbeleuchtung.
While running a full linux system with userspace
In this mode, a power-button press of 5 seconds will be sufficient. After this, the init process will take care of safely shutting down the phone, which might take up to 20 extra seconds. The X server should get killed, you should drop back to a (garbled) console, and it should finally switch off - much like a regular Linux PC.
Battery charging
The Neo1973 supports two charging modes: One 100mA charge mode (called pre-charge) and 500mA (called fast charge). Charging is always done via the USB socket. You can use any USB-A to USB-mini-B cable to connect the phone to any USB host.
While in u-boot
While you are in u-boot mode, the phone only charges with 100mA by default. (This will change in one of the future revisions).
However, using the u-boot console you can manually enable fast charging. See U-boot#Battery_charger_related for more information.
While in Linux
As soon as the phone is connected via USB cable, it will charge. However, the default charging current is only 100mA, way too little if you want to operate the phone and charge at the same time.
If your USB upstream port is capable of supplying 500mA, then it will configure the Neo1973 accordingly and use 500mA charging mode. You can notice this by the following line in the kernel log
usb0: full speed config #1: 500 mA, Ethernet Gadget, using CDC Ethernet
Getting shell access on the phone
By using the terminal emulator and on-screen keyboard
"Click" (using a stylus) the top-left arrow icon to get a drop-down menu with "Media", "Settings", "Utilities" and "Desktop". Choose "Utilities->Panel->Input Manager", and a keyboard icon will appear on the top bar. You can get an on-screen keyboard at any time by choosing it.
From the desktop, choose "Active tasks->rxvt" to get a root shell.
By using Ethernet emulation over a USB cable
The standard Neo1973 Linux kernel has support for the "cdc_ether USB gadget", i.e. a standard implementation of how to emulate an Ethernet device over USB.
As soon as the kernel is up and running, and you have the phone connected via USB, you should get a usb0 device on your host.
The Phone will have the IPv4 address 192.168.0.202/24. You can run `ifconfig` in the terminal on the phone to verify this (this is optional, just check it if it doesn't work given the instructions below)
If you plug a USB cable into a laptop running Linux, you'll likely see the "cdc_ether" kernel module being loaded and a usb0 network interface appear.
On the host PC, you should then configure your interface to 192.168.0.200 by using
# ifconfig usb0 192.168.0.200 netmask 255.255.255.0
Then you should be able to
# ping 192.168.0.202
and last, but not least
# ssh root@192.168.0.202
Once you press 'enter' (empty password), you should now have a root login.
By using the debug board/serial/JTAG
Please see Debug Board#Usage_Instructions
Getting access to the bootloader console
Please see u-boot#Using_usbtty_from_Linux

