Manual Debian

From Openmoko

Revision as of 01:05, 4 July 2008 by Nezza (Talk | contribs)

Jump to: navigation, search
Debian on neo1973

This page is to explain how to run debian armel port on neo1973. These instructions are likely to work on freerunner, too.

All the steps below take approximately 2h depending on your internet connection. Most of the time your system will work on its own (apt-getting xfce4 takes a loong time..).

If you do not have the time feel free to download a ready to use tar archive of the results of everything described below. Just extract the contents to your sd card!

wget http://rabenfrost.net/debian/debian-armel-xfce.tar.bz2
  • root-pw: openmoko
  • 1st user: openmoko (pw: openmoko)

Extract it directly to your sd card - have fun!

Contents

1. (optional) install known good kernel

this kernel was build by Marcel_M and has some important patches in it such as removed sd debug symbols and build-in ext3 support.

wget http://rabenfrost.net/celtune/uImage-2.6.24+svnr4194-r4165-r3-neo1973.bin
./dfu-util -d 0x1457:0x5119 -a kernel -R -D ./uImage-2.6.24+svnr4194-r4165-r3-neo1973.bin

As there is no way to boot from sdhc with uboot directly I always copy my kernel to flash and let it boot my rootfs from sd but feel free to do it your way.

2. configure booting from sd/sdhc

Do as proposed here: Booting_from_SD

3.1. (option #1) debootstrap your own armel rootfs

debootstrap your rootfs on debian or ubuntu

debootstrap --verbose --arch armel --foreign sid ./armel-chroot http://ftp.de.debian.org/debian/

3.2. (option #2) download ready to use armel rootfs

if you dont have debootstrap on your system you can download the results here:

wget http://rabenfrost.net/debian/armel-chroot-first-stage.tar.gz

4 prepare sd card

ssh to your neo and format your sd card appropriately. I'm using an 8GB sdhc card here.

umount /media/card
mkfs.ext3 /dev/mmcblk0p1
mount /dev/mmcblk0p1 /media/card

copy the armel chroot to your device by tar'ing it to circumvent symbolic link cycles (https://bugzilla.mindrot.org/show_bug.cgi?id=1059 <= WONTFIX)

tar -C ./armel-chroot/ -c . | ssh root@192.168.0.202 tar -C /media/card -xv

or if you downloaded the archive

cat armel-chroot-first-stage.tar.gz | ssh root@192.168.0.202 tar -C /media/card -xzvf

5. complete debootstrap process

ssh to your device and execute the following commands (just copypaste everything below)

echo "nameserver 192.168.0.200" > /media/card/etc/resolv.conf
echo "fic-gta01" > /media/card/etc/hostname
echo "127.0.0.1 localhost.localdomain localhost fic-gta01" > /media/card/etc/hosts
echo -e "auto lo\n\
iface lo inet loopback\n\
auto usb0\n\
iface usb0 inet static\n\
    address 192.168.0.202\n\
    netmask 255.255.255.0\n\
    network 192.168.0.0\n\
    gateway 192.168.0.200\n\
    up echo nameserver 192.168.0.200 >/etc/resolv.conf" > /media/card/etc/network/interfaces
echo -e "rootfs  /                ext3    defaults,errors=remount-ro,noatime 0 1\n\
proc    /proc            proc    defaults                           0 0\n\
tmpfs   /etc/network/run tmpfs   defaults,noatime                   0 0\n\
tmpfs   /tmp             tmpfs   defaults,noatime                   0 0\n\
tmpfs   /var/lock        tmpfs   defaults,noatime                   0 0\n\
tmpfs   /var/log         tmpfs   defaults,noatime                   0 0\n\
tmpfs   /var/run         tmpfs   defaults,noatime                   0 0\n\
tmpfs   /var/tmp         tmpfs   defaults,noatime                   0 0" > /media/card/etc/fstab

now chroot into your armel rootfs and finish the install

chroot /media/card
/debootstrap/debootstrap --second-stage

make sure your internal clock is set to the correct date because apt-get will complain if otherwise (does not work on the gta02 at the moment: "Cannot access the Hardware Clock via any known method.")

hwclock --set --date="MM/DD/YY hh:mm:ss"

install openssh so you can login remotely

echo "deb http://ftp.de.debian.org/debian sid main" > /etc/apt/sources.list
apt-get update
apt-get upgrade
apt-get install openssh-server

install and configure locales

apt-get install locales
dpkg-reconfigure locales

install udev to dynamically create /dev

apt-get install udev

set a root password

passwd

create a normal user

adduser <yournamehere>

6. get x running

now reboot and start your debian. you can login with ssh and start configuring xorg:

apt-get install xorg

configure /etc/X11/xorg.conf so that it looks like this:

Section "InputDevice"
       Identifier      "Configured Mouse"
       Driver          "mouse"
       Option          "Device" "/dev/input/mice"
EndSection
Section "Device"
       Identifier      "Configured Video Device"
       Driver          "fbdev"
EndSection
Section "Monitor"
       Identifier      "Configured Monitor"
EndSection
Section "Screen"
       Identifier      "Default Screen"
       Monitor         "Configured Monitor"
EndSection
Section "ServerLayout"
       Identifier      "Default Layout"
       Screen          "Default Screen"
       InputDevice     "Configured Mouse"
EndSection

start x in the first vt:

startx -- vt1

7. get touchscreen working

install the tslib driver:

apt-get install xserver-xorg-input-tslib

edit /etc/udev/udev.rules as the tslib device is hardcoded for now. search for the input devices section and make the first line look like this:

# input devices
KERNEL=="event1",               NAME="event0"

and edit the InputDevice section in your xorg.conf

Section "InputDevice"
       Identifier "Configured Mouse"
       Driver "tslib"
       Option "CorePointer"
       Option "Device" "/dev/input/event1"
       Option "Protocol" "Auto"
EndSection

calibrate your touchscreen

echo -67 36365 -2733100 -48253 -310 45219816 65536 > /etc/pointercal

start x and enjoy!!

startx -- vt1

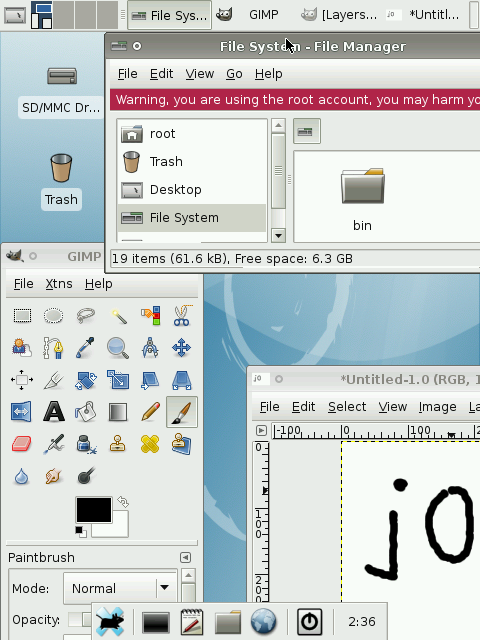
8. install gdm and xfce4

simple...

apt-get install gdm xfce4 xvkbd

configure gdm so xkvbd will allow you to put in your username and password. simply add this to the end of /etc/gdm/Init/Default before exit 0 so that the three last lines look like this:

fi
sleep 20 && /usr/bin/xvkbd -xdm -compact -geometry 480x210+0+0 &
exit 0

simply click on the focus button of xvkbd and then on the input box of gdm to input your username and password there.

on each boot gdm should start automatically now.

if you like you can also download a correctly sized debian wallpaper I generated from the svg source for 480x640:

wget http://rabenfrost.net/debian/debian-blueish-wallpaper-480x640.png -O /usr/share/images/desktop-base/desktop-background

9. clean up

apt-get clean

10. load additional kernel modules

These are for sound (!!), bluetooth and usb foo. Use the modules archive that fits to your kernel.

wget http://rabenfrost.net/celtune/modules-2.6.24+svnr4194-r4165-r3-neo1973.tgz
tar -xf modules-2.6.24+svnr4194-r4165-r3-neo1973.tgz -C /
depmod -a
echo -e "hci_usb\n\
hidp\n\
ohci-hcd\n\
rfcomm\n\
snd-mixer-oss\n\
snd-pcm-oss\n\
snd-soc-neo1973-wm8753" > /etc/modules
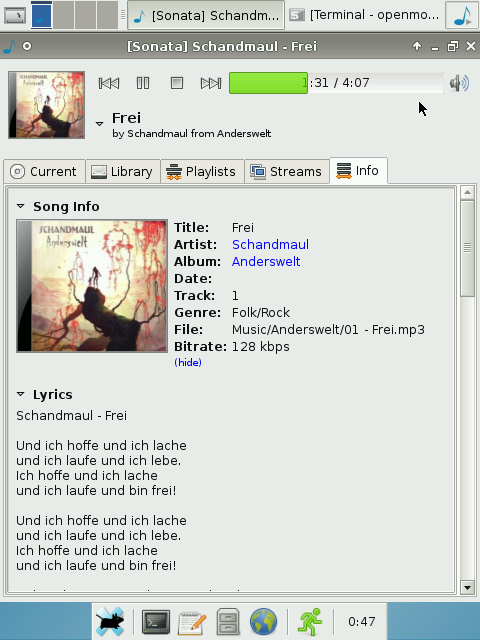
Sonata on neo1973

11. enable sound

Now we turn our Debian into a jukebox!

apt-get install alsa-base
wget http://rabenfrost.net/celtune/alsa_state_files-working.tar.gz
tar -xf alsa_state_files-working.tar.gz -C /etc
alsactl -f /etc/alsa_state_files-working/stereoout.state restore
addgroup openmoko audio

I currently use mpd+sonata - let me know if you know another nice lightweight gtk player. Unfortunately rhythmbox is way to much for the neo to handle - the mp3 playing stops after 20secs.

Personal tools
Debian on neo1973

This page is to explain how to run debian armel port on neo1973. These instructions are likely to work on freerunner, too.

All the steps below take approximately 2h depending on your internet connection. Most of the time your system will work on its own (apt-getting xfce4 takes a loong time..).

If you do not have the time feel free to download a ready to use tar archive of the results of everything described below. Just extract the contents to your sd card!

wget http://rabenfrost.net/debian/debian-armel-xfce.tar.bz2
  • root-pw: openmoko
  • 1st user: openmoko (pw: openmoko)

Extract it directly to your sd card - have fun!

1. (optional) install known good kernel

this kernel was build by Marcel_M and has some important patches in it such as removed sd debug symbols and build-in ext3 support.

wget http://rabenfrost.net/celtune/uImage-2.6.24+svnr4194-r4165-r3-neo1973.bin
./dfu-util -d 0x1457:0x5119 -a kernel -R -D ./uImage-2.6.24+svnr4194-r4165-r3-neo1973.bin

As there is no way to boot from sdhc with uboot directly I always copy my kernel to flash and let it boot my rootfs from sd but feel free to do it your way.

2. configure booting from sd/sdhc

Do as proposed here: Booting_from_SD

3.1. (option #1) debootstrap your own armel rootfs

debootstrap your rootfs on debian or ubuntu

debootstrap --verbose --arch armel --foreign sid ./armel-chroot http://ftp.de.debian.org/debian/

3.2. (option #2) download ready to use armel rootfs

if you dont have debootstrap on your system you can download the results here:

wget http://rabenfrost.net/debian/armel-chroot-first-stage.tar.gz

4 prepare sd card

ssh to your neo and format your sd card appropriately. I'm using an 8GB sdhc card here.

umount /media/card
mkfs.ext3 /dev/mmcblk0p1
mount /dev/mmcblk0p1 /media/card

copy the armel chroot to your device by tar'ing it to circumvent symbolic link cycles (https://bugzilla.mindrot.org/show_bug.cgi?id=1059 <= WONTFIX)

tar -C ./armel-chroot/ -c . | ssh root@192.168.0.202 tar -C /media/card -xv

or if you downloaded the archive

cat armel-chroot-first-stage.tar.gz | ssh root@192.168.0.202 tar -C /media/card -xzvf

5. complete debootstrap process

ssh to your device and execute the following commands (just copypaste everything below)

echo "nameserver 192.168.0.200" > /media/card/etc/resolv.conf
echo "fic-gta01" > /media/card/etc/hostname
echo "127.0.0.1 localhost.localdomain localhost fic-gta01" > /media/card/etc/hosts
echo -e "auto lo\n\
iface lo inet loopback\n\
auto usb0\n\
iface usb0 inet static\n\
    address 192.168.0.202\n\
    netmask 255.255.255.0\n\
    network 192.168.0.0\n\
    gateway 192.168.0.200\n\
    up echo nameserver 192.168.0.200 >/etc/resolv.conf" > /media/card/etc/network/interfaces
echo -e "rootfs  /                ext3    defaults,errors=remount-ro,noatime 0 1\n\
proc    /proc            proc    defaults                           0 0\n\
tmpfs   /etc/network/run tmpfs   defaults,noatime                   0 0\n\
tmpfs   /tmp             tmpfs   defaults,noatime                   0 0\n\
tmpfs   /var/lock        tmpfs   defaults,noatime                   0 0\n\
tmpfs   /var/log         tmpfs   defaults,noatime                   0 0\n\
tmpfs   /var/run         tmpfs   defaults,noatime                   0 0\n\
tmpfs   /var/tmp         tmpfs   defaults,noatime                   0 0" > /media/card/etc/fstab

now chroot into your armel rootfs and finish the install

chroot /media/card
/debootstrap/debootstrap --second-stage

make sure your internal clock is set to the correct date because apt-get will complain if otherwise (does not work on the gta02 at the moment: "Cannot access the Hardware Clock via any known method.")

hwclock --set --date="MM/DD/YY hh:mm:ss"

install openssh so you can login remotely

echo "deb http://ftp.de.debian.org/debian sid main" > /etc/apt/sources.list
apt-get update
apt-get upgrade
apt-get install openssh-server

install and configure locales

apt-get install locales
dpkg-reconfigure locales

install udev to dynamically create /dev

apt-get install udev

set a root password

passwd

create a normal user

adduser <yournamehere>

6. get x running

now reboot and start your debian. you can login with ssh and start configuring xorg:

apt-get install xorg

configure /etc/X11/xorg.conf so that it looks like this:

Section "InputDevice"
       Identifier      "Configured Mouse"
       Driver          "mouse"
       Option          "Device" "/dev/input/mice"
EndSection
Section "Device"
       Identifier      "Configured Video Device"
       Driver          "fbdev"
EndSection
Section "Monitor"
       Identifier      "Configured Monitor"
EndSection
Section "Screen"
       Identifier      "Default Screen"
       Monitor         "Configured Monitor"
EndSection
Section "ServerLayout"
       Identifier      "Default Layout"
       Screen          "Default Screen"
       InputDevice     "Configured Mouse"
EndSection

start x in the first vt:

startx -- vt1

7. get touchscreen working

install the tslib driver:

apt-get install xserver-xorg-input-tslib

edit /etc/udev/udev.rules as the tslib device is hardcoded for now. search for the input devices section and make the first line look like this:

# input devices
KERNEL=="event1",               NAME="event0"

and edit the InputDevice section in your xorg.conf

Section "InputDevice"
       Identifier "Configured Mouse"
       Driver "tslib"
       Option "CorePointer"
       Option "Device" "/dev/input/event1"
       Option "Protocol" "Auto"
EndSection

calibrate your touchscreen

echo -67 36365 -2733100 -48253 -310 45219816 65536 > /etc/pointercal

start x and enjoy!!

startx -- vt1

8. install gdm and xfce4

simple...

apt-get install gdm xfce4 xvkbd

configure gdm so xkvbd will allow you to put in your username and password. simply add this to the end of /etc/gdm/Init/Default before exit 0 so that the three last lines look like this:

fi
sleep 20 && /usr/bin/xvkbd -xdm -compact -geometry 480x210+0+0 &
exit 0

simply click on the focus button of xvkbd and then on the input box of gdm to input your username and password there.

on each boot gdm should start automatically now.

if you like you can also download a correctly sized debian wallpaper I generated from the svg source for 480x640:

wget http://rabenfrost.net/debian/debian-blueish-wallpaper-480x640.png -O /usr/share/images/desktop-base/desktop-background

9. clean up

apt-get clean

10. load additional kernel modules

These are for sound (!!), bluetooth and usb foo. Use the modules archive that fits to your kernel.

wget http://rabenfrost.net/celtune/modules-2.6.24+svnr4194-r4165-r3-neo1973.tgz
tar -xf modules-2.6.24+svnr4194-r4165-r3-neo1973.tgz -C /
depmod -a
echo -e "hci_usb\n\
hidp\n\
ohci-hcd\n\
rfcomm\n\
snd-mixer-oss\n\
snd-pcm-oss\n\
snd-soc-neo1973-wm8753" > /etc/modules
Sonata on neo1973

11. enable sound

Now we turn our Debian into a jukebox!

apt-get install alsa-base
wget http://rabenfrost.net/celtune/alsa_state_files-working.tar.gz
tar -xf alsa_state_files-working.tar.gz -C /etc
alsactl -f /etc/alsa_state_files-working/stereoout.state restore
addgroup openmoko audio

I currently use mpd+sonata - let me know if you know another nice lightweight gtk player. Unfortunately rhythmbox is way to much for the neo to handle - the mp3 playing stops after 20secs.