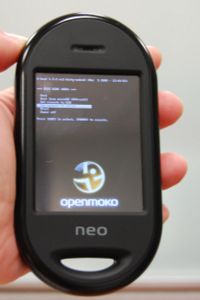
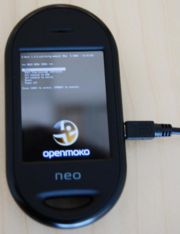
Getting Started with your Neo FreeRunner

From Openmoko

Revision as of 16:35, 11 July 2008 by Abraxa (Talk | contribs)

Jump to: navigation, search


Thank you for purchasing this Developer release of Neo FreeRunner. The Neo FreeRunner phone is the second hardware platform to take advantage of Openmoko. This guide will help you get to know your Neo FreeRunner and how to start using your Neo FreeRunner.

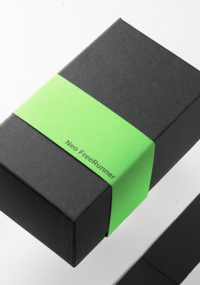
Neo FreeRunner Package

Contents

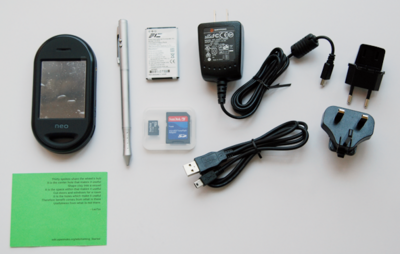
The Package Contents

Inside package
Circle2.gif Neo FreeRunner
Circle2.gif Stylus
Circle2.gif Battery
Circle2.gif Charger
Circle2.gif USB Cable
Circle2.gif microSD Card 512MB

Getting To Know the Neo FreeRunner

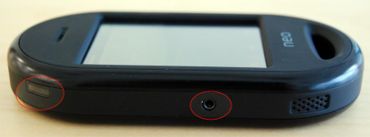
AUX Button and phone jack(From left to right)
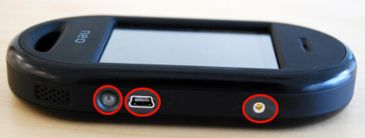
Power Button, USB and external GPS Antenna (From left to right)
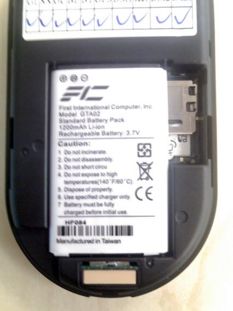
AUX Back side with battery
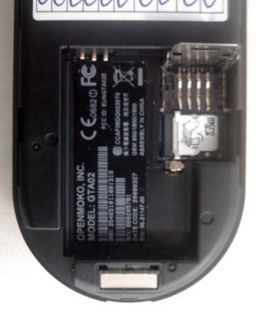
Put the SIM card and SD card here
open case from this side
Opened

Installing the Micro-SD card, the SIM card, and the Battery

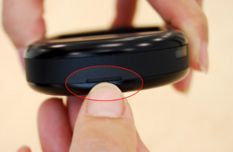
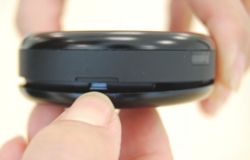
  1. Remove the rear cover of the Neo FreeRunner by first holding the Neo FreeRunner on the side and then use your fingernail to prise off the rear cover at the slot on top of the device.
  2. Now you should be able to locate the combined SIM and Micro-SD card holder at the bottom of the battery compartment.
  3. Unlock the SIM card holder by sliding the metal clip down, towards the USB socket, with your fingernail. Use caution, as these parts are delicate and could be damaged by forcing them in the wrong direction.
  4. Lift up on the SIM card holder.
  5. The Micro-SD card holder is held in place by a latch on either side. It is easiest to open the Micro-SD card holder by releasing these latches one at a time rather than by lifting from the middle, as lifting from the middle tends to increase the latching pressure. A small screwdriver or knife can be used for this.
  6. Insert the Micro-SD card into the Micro-SD card holder. Note that the electrical contacts should face down and towards the edge of the Neo Freerunner.
  7. Close the Micro-SD card holder, making sure that both latches are securely fastened.
  8. Insert the SIM card into the SIM card holder, taking care to slide inside the two metal tabs in the cover. Please note that the electrical contacts should face down and that the cut corner should be closest to the external GPS Antenna Socket.
  9. Close the SIM card holder and lock it by sliding the metal clip towards the external GPS Antenna Socket on the FreeRunner.
  10. Insert the battery into the battery compartment, aligning the electrical contacts on the battery with the electrical contacts in the battery compartment. Insert the side with the electrical contacts first.
  11. Replace the rear cover on the FreeRunner.

Turning on the Neo Freerunner

Charging the Neo Freerunner

When using the Neo Freerunner for the first time, you should charge the battery completely. The battery can be charged using the provided charger (at 1000mA) or from a powered USB port capable of providing 500mA worth of current. Most computers will be able to charge the FreeRunner without any problems.

Charging at 100mA takes 6-12 hours and at 500mA takes 1-2 hours. (from openmoko.togaware.com)

Unlocking the screen

When the screen is locked, you should see a Matrix-style green graphic with the Openmoko symbol in the middle of the bottom of the screen along with lock and unlock symbols. If you drag the Openmoko symbol to the unlock symbol at the top then the screen will become unlocked.

Connect to the Neo FreeRunner By USB Networking

Connect the Neo FreeRunner to a GNU/Linux host with the USB cable. For Mac OS X please refer to MacOS_X. After booting into the Openmoko image there will be a new interface, usb0, on your GNU/Linux host.

Manual Method

Type in the following commands in the terminal of a GNU/Linux host:

ifconfig usb0 192.168.0.200 netmask 255.255.255.0
ssh root@192.168.0.202

Press Enter to get by the password.

Automatic Method
  • Debian and derivatives (Ubuntu, Sidux etc.)

Edit /etc/network/interfaces:

auto usb0
iface usb0 inet static
address 192.168.0.200
netmask 255.255.255.0
  • Gentoo

Edit /etc/conf.d/net:

config_usb0="192.168.0.200/24"

Restart the networking service ('/etc/init.d/networking restart' for Debian-based systems) and then type the following command in the terminal of the GNU/Linux host:

ssh root@192.168.0.202

Press Enter to get by the password.

NOTE:

If your network device is using the ip range 192.168.0.x you may have to use the following command before you are able to connect

route add -host 192.168.0.202 dev usb0 


Making things even more automatic

If you don't want to remember the IP address of your phone then you can create an alias by adding the following line to your /etc/hosts:

192.168.0.202   openmoko

Now it should be possible to connect to your phone using the following command:

ssh root@openmoko

The above only gets you a Secure Shell connection to the Openmoko device, it does not allow the Openmoko device to connect to the Internet. If you are interested in connecting the device to the internet then check out the USB_Networking section.

Sharing your Internet connection via USB

In Ubuntu:

Within /etc/network/interfaces, change your interface setup to this:

auto usb0
iface usb0 inet static
   address 192.168.0.200
   netmask 255.255.255.0
   network 192.168.0.0
   up iptables -A POSTROUTING -t nat -j MASQUERADE -s 192.168.0.0/24 &
   up echo 1 > /proc/sys/net/ipv4/ip_forward &
   up iptables -P FORWARD ACCEPT &
   down iptables -D POSTROUTING -t nat -j MASQUERADE -s 192.168.0.0/24 &

Then, on your Freerunner, edit /etc/ and modify the code from this:

iface usb0 inet static
       address 192.168.0.202
       netmask 255.255.255.0
       network 192.168.0.0
       gateway 192.168.0.200
       up echo nameserver 192.168.0.200 > /etc/resolv.conf

to something that points to a real name server, like a public DNS system from OpenDNS, like this:

iface usb0 inet static
       address 192.168.0.202
       netmask 255.255.255.0
       network 192.168.0.0
       gateway 192.168.0.200
       up echo nameserver 208.67.222.222 > /etc/resolv.conf
       up echo nameserver 208.67.220.220 >> /etc/resolv.conf

Un-crippling the 2007.2 image

The stock 2007.2 image flashed onto the Neo FreeRunner is really just the bare bones. For example, you don't have the clock and the quick-launch icons showing. Here's how you can change that:

# dbus-launch gconftool-2 -t boolean -s /desktop/poky/interface/reduced false
# /etc/init.d/xserver-nodm restart

If you rather have a regular clock instead of the digital one, do this instead:

# dbus-launch gconftool-2 -t boolean -s /desktop/poky/interface/reduced false
# dbus-launch gconftool-2 -t boolean -s /desktop/poky/interface/digital_clock false
# /etc/init.d/xserver-nodm restart

With either clock, you may wish to set the correct Timezone.

Also, if you prefer having a full keyboard, see these instructions.

Recommended software

To test GPS, you can use agpsui:

# opkg install openmoko-agpsui

For a nice map, try tangoGPS:

# opkg install tangogps

And if you want the Media Player back:

# opkg install openmoko-mediaplayer2
# wget http://abraxa.dyndns.org:81/random/openmoko-mediaplayer-theme.tar.bz2
# tar xjf openmoko-mediaplayer-theme.tar.bz2 -C /usr/share/themes/Moko/gtk-2.0

If you want a basic image viewer, have a look at the one from the gpe suite:

# opkg install gpe-icons gpe-gallery

To obtain the standard web browser, use:

# opkg install openmoko-browser2

There are tons more apps you can install - check out the Repositories for a list of packages.

Booting the Neo Freerunner

You can boot your Neo FreeRunner in the following ways:

Circle2.gif You can power it up into an Openmoko image directly.
Circle2.gif You can boot it into U-Boot via NAND Flash.
Circle2.gif You can boot it into U-Boot via NOR Flash.

Booting the device into NAND and NOR Flash allows you to update the kernel and root filesystem.

Start the Openmoko Image

Menu2.jpg

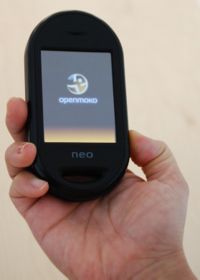
Press and hold Power button for about 8 seconds, until the Openmoko splash screen turns up. You may now release the Power button and the Neo FreeRunner will continue to boot into the Openmoko Image.

Log into U-Boot in the NAND Flash

Menu7.jpg

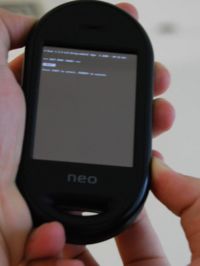
Press and hold Power button, then press and hold AUX button for about 5 to 8 seconds. You should see the boot menu for the NAND Flash. Press the AUX button to select one of the options and then press the Power button to execute.

Log into U-Boot in the NOR Flash

Menu6.jpg

Press and hold the AUX button, then press and hold the Power button. Then, release the AUX button. You should see the boot menu for the NOR Flash. This option is usually used by developers or when flashing the FreeRunner. If you cannot log into U-Boot in NAND then you can log into U-Boot in the NOR Flash either.

NOTE: There are six options you can choose when you log into the NOR Flash.

1. Boot

2. Boot from MicroSD

3. Set console to USB

4. Set console to Serial

5. Reset

6. Power off


NOTE: The term Logging in used in this context means to turn on the device using the described method, and leaving it at the U-Boot menu. To avoid the device automatically booting, tap the AUX key to move the selector bar. Note also that the device will not automatically turn off while flashing is in progress.


Flashing the Neo FreeRunner

As Openmoko development continues, Openmoko regularly releases updated versions of the Openmoko root filesystem, the kernel, and the U-Boot. These may be programmed into the Flash memory of Neo FreeRunner. You can use the USB cable and Openmoko provided tool to flash Neo FreeRunner.

NOTE: The Openmoko software team builds images daily. If you want to use the latest images, you can download the image from the daily build, but we recommend you download the most stable image from http://downloads.openmoko.org/releases/Freerunner/. Images here have been tested by the test team.

More about current Images: http://wiki.openmoko.org/wiki/Latest_Images


Step1. Download the DFU-util

You can download the flashing tool from: http://downloads.openmoko.org/releases/Freerunner/dfu-util

On the GNU/Linux host you can use the following command to download the dfu-util:

wget http://downloads.openmoko.org/releases/Freerunner/dfu-util

Afterwards you have to change the rights on the file:

chmod a+x dfu-util

Step 2. Flashing the Kernel

You can download the kernel from http://downloads.openmoko.org/releases/Freerunner/

Type in the following command in the terminal on a GNU/Linux host. On some systems you need to be root before this will work.

./dfu-util -a (partion name) -R -D (download image file name)


ex:

./dfu-util -a kernel -R -D uImage-2.6.24+svnr4082-r4055-r3-neo1973.bin
Log into U-Boot in NOR Flash, connect your Neo with Linux Host via USB cable

Before you execute the command, please log into U-Boot in the NOR Flash. The Neo FreeRunner needs to be booted into U-Boot for flashing.

You will then need to connect your Neo with the GNU/Linux host via USB cable. Press Enter to execute the command. When flashing succeeds the following will be shown:

status(0) = No error condition is present
Done!

NOTE: The meaning of the parameters you specified:

-a --alt alt Specify the altsetting of the DFU interface by name or by number
-R --reset Issue USB Reset signalling once we're finished
-D --download file Write firmware from<file> into device


Step 3. Flashing the Root Filesystem

You can download the root filesystem from: http://downloads.openmoko.org/releases/Freerunner/

Type the following command in the terminal of a GNU/Linux host. On some systems you will need to be root.

./dfu-util -a rootfs -R -D openmoko-devel-image-fic-gta02.jffs2

When flashing succeeds the following will be shown:

status(0) = No error condition is present
Done!

Appendix

If you want to know more about the Neo FreeRunner then you can get more information in the following topics:

Views
Personal tools


Thank you for purchasing this Developer release of Neo FreeRunner. The Neo FreeRunner phone is the second hardware platform to take advantage of Openmoko. This guide will help you get to know your Neo FreeRunner and how to start using your Neo FreeRunner.

Neo FreeRunner Package

The Package Contents

Inside package
Circle2.gif Neo FreeRunner
Circle2.gif Stylus
Circle2.gif Battery
Circle2.gif Charger
Circle2.gif USB Cable
Circle2.gif microSD Card 512MB

Getting To Know the Neo FreeRunner

AUX Button and phone jack(From left to right)
Power Button, USB and external GPS Antenna (From left to right)
AUX Back side with battery
Put the SIM card and SD card here
open case from this side
Opened

Installing the Micro-SD card, the SIM card, and the Battery

  1. Remove the rear cover of the Neo FreeRunner by first holding the Neo FreeRunner on the side and then use your fingernail to prise off the rear cover at the slot on top of the device.
  2. Now you should be able to locate the combined SIM and Micro-SD card holder at the bottom of the battery compartment.
  3. Unlock the SIM card holder by sliding the metal clip down, towards the USB socket, with your fingernail. Use caution, as these parts are delicate and could be damaged by forcing them in the wrong direction.
  4. Lift up on the SIM card holder.
  5. The Micro-SD card holder is held in place by a latch on either side. It is easiest to open the Micro-SD card holder by releasing these latches one at a time rather than by lifting from the middle, as lifting from the middle tends to increase the latching pressure. A small screwdriver or knife can be used for this.
  6. Insert the Micro-SD card into the Micro-SD card holder. Note that the electrical contacts should face down and towards the edge of the Neo Freerunner.
  7. Close the Micro-SD card holder, making sure that both latches are securely fastened.
  8. Insert the SIM card into the SIM card holder, taking care to slide inside the two metal tabs in the cover. Please note that the electrical contacts should face down and that the cut corner should be closest to the external GPS Antenna Socket.
  9. Close the SIM card holder and lock it by sliding the metal clip towards the external GPS Antenna Socket on the FreeRunner.
  10. Insert the battery into the battery compartment, aligning the electrical contacts on the battery with the electrical contacts in the battery compartment. Insert the side with the electrical contacts first.
  11. Replace the rear cover on the FreeRunner.

Turning on the Neo Freerunner

Charging the Neo Freerunner

When using the Neo Freerunner for the first time, you should charge the battery completely. The battery can be charged using the provided charger (at 1000mA) or from a powered USB port capable of providing 500mA worth of current. Most computers will be able to charge the FreeRunner without any problems.

Charging at 100mA takes 6-12 hours and at 500mA takes 1-2 hours. (from openmoko.togaware.com)

Unlocking the screen

When the screen is locked, you should see a Matrix-style green graphic with the Openmoko symbol in the middle of the bottom of the screen along with lock and unlock symbols. If you drag the Openmoko symbol to the unlock symbol at the top then the screen will become unlocked.

Connect to the Neo FreeRunner By USB Networking

Connect the Neo FreeRunner to a GNU/Linux host with the USB cable. For Mac OS X please refer to MacOS_X. After booting into the Openmoko image there will be a new interface, usb0, on your GNU/Linux host.

Manual Method

Type in the following commands in the terminal of a GNU/Linux host:

ifconfig usb0 192.168.0.200 netmask 255.255.255.0
ssh root@192.168.0.202

Press Enter to get by the password.

Automatic Method

Edit /etc/network/interfaces:

auto usb0
iface usb0 inet static
address 192.168.0.200
netmask 255.255.255.0

Edit /etc/conf.d/net:

config_usb0="192.168.0.200/24"

Restart the networking service ('/etc/init.d/networking restart' for Debian-based systems) and then type the following command in the terminal of the GNU/Linux host:

ssh root@192.168.0.202

Press Enter to get by the password.

NOTE:

If your network device is using the ip range 192.168.0.x you may have to use the following command before you are able to connect

route add -host 192.168.0.202 dev usb0 


Making things even more automatic

If you don't want to remember the IP address of your phone then you can create an alias by adding the following line to your /etc/hosts:

192.168.0.202   openmoko

Now it should be possible to connect to your phone using the following command:

ssh root@openmoko

The above only gets you a Secure Shell connection to the Openmoko device, it does not allow the Openmoko device to connect to the Internet. If you are interested in connecting the device to the internet then check out the USB_Networking section.

Sharing your Internet connection via USB

In Ubuntu:

Within /etc/network/interfaces, change your interface setup to this:

auto usb0
iface usb0 inet static
   address 192.168.0.200
   netmask 255.255.255.0
   network 192.168.0.0
   up iptables -A POSTROUTING -t nat -j MASQUERADE -s 192.168.0.0/24 &
   up echo 1 > /proc/sys/net/ipv4/ip_forward &
   up iptables -P FORWARD ACCEPT &
   down iptables -D POSTROUTING -t nat -j MASQUERADE -s 192.168.0.0/24 &

Then, on your Freerunner, edit /etc/ and modify the code from this:

iface usb0 inet static
       address 192.168.0.202
       netmask 255.255.255.0
       network 192.168.0.0
       gateway 192.168.0.200
       up echo nameserver 192.168.0.200 > /etc/resolv.conf

to something that points to a real name server, like a public DNS system from OpenDNS, like this:

iface usb0 inet static
       address 192.168.0.202
       netmask 255.255.255.0
       network 192.168.0.0
       gateway 192.168.0.200
       up echo nameserver 208.67.222.222 > /etc/resolv.conf
       up echo nameserver 208.67.220.220 >> /etc/resolv.conf

Un-crippling the 2007.2 image

The stock 2007.2 image flashed onto the Neo FreeRunner is really just the bare bones. For example, you don't have the clock and the quick-launch icons showing. Here's how you can change that:

# dbus-launch gconftool-2 -t boolean -s /desktop/poky/interface/reduced false
# /etc/init.d/xserver-nodm restart

If you rather have a regular clock instead of the digital one, do this instead:

# dbus-launch gconftool-2 -t boolean -s /desktop/poky/interface/reduced false
# dbus-launch gconftool-2 -t boolean -s /desktop/poky/interface/digital_clock false
# /etc/init.d/xserver-nodm restart

With either clock, you may wish to set the correct Timezone.

Also, if you prefer having a full keyboard, see these instructions.

Recommended software

To test GPS, you can use agpsui:

# opkg install openmoko-agpsui

For a nice map, try tangoGPS:

# opkg install tangogps

And if you want the Media Player back:

# opkg install openmoko-mediaplayer2
# wget http://abraxa.dyndns.org:81/random/openmoko-mediaplayer-theme.tar.bz2
# tar xjf openmoko-mediaplayer-theme.tar.bz2 -C /usr/share/themes/Moko/gtk-2.0

If you want a basic image viewer, have a look at the one from the gpe suite:

# opkg install gpe-icons gpe-gallery

To obtain the standard web browser, use:

# opkg install openmoko-browser2

There are tons more apps you can install - check out the Repositories for a list of packages.

Booting the Neo Freerunner

You can boot your Neo FreeRunner in the following ways:

Circle2.gif You can power it up into an Openmoko image directly.
Circle2.gif You can boot it into U-Boot via NAND Flash.
Circle2.gif You can boot it into U-Boot via NOR Flash.

Booting the device into NAND and NOR Flash allows you to update the kernel and root filesystem.

Start the Openmoko Image

Menu2.jpg

Press and hold Power button for about 8 seconds, until the Openmoko splash screen turns up. You may now release the Power button and the Neo FreeRunner will continue to boot into the Openmoko Image.

Log into U-Boot in the NAND Flash

Menu7.jpg

Press and hold Power button, then press and hold AUX button for about 5 to 8 seconds. You should see the boot menu for the NAND Flash. Press the AUX button to select one of the options and then press the Power button to execute.

Log into U-Boot in the NOR Flash

Menu6.jpg

Press and hold the AUX button, then press and hold the Power button. Then, release the AUX button. You should see the boot menu for the NOR Flash. This option is usually used by developers or when flashing the FreeRunner. If you cannot log into U-Boot in NAND then you can log into U-Boot in the NOR Flash either.

NOTE: There are six options you can choose when you log into the NOR Flash.

1. Boot

2. Boot from MicroSD

3. Set console to USB

4. Set console to Serial

5. Reset

6. Power off


NOTE: The term Logging in used in this context means to turn on the device using the described method, and leaving it at the U-Boot menu. To avoid the device automatically booting, tap the AUX key to move the selector bar. Note also that the device will not automatically turn off while flashing is in progress.


Flashing the Neo FreeRunner

As Openmoko development continues, Openmoko regularly releases updated versions of the Openmoko root filesystem, the kernel, and the U-Boot. These may be programmed into the Flash memory of Neo FreeRunner. You can use the USB cable and Openmoko provided tool to flash Neo FreeRunner.

NOTE: The Openmoko software team builds images daily. If you want to use the latest images, you can download the image from the daily build, but we recommend you download the most stable image from http://downloads.openmoko.org/releases/Freerunner/. Images here have been tested by the test team.

More about current Images: http://wiki.openmoko.org/wiki/Latest_Images


Step1. Download the DFU-util

You can download the flashing tool from: http://downloads.openmoko.org/releases/Freerunner/dfu-util

On the GNU/Linux host you can use the following command to download the dfu-util:

wget http://downloads.openmoko.org/releases/Freerunner/dfu-util

Afterwards you have to change the rights on the file:

chmod a+x dfu-util

Step 2. Flashing the Kernel

You can download the kernel from http://downloads.openmoko.org/releases/Freerunner/

Type in the following command in the terminal on a GNU/Linux host. On some systems you need to be root before this will work.

./dfu-util -a (partion name) -R -D (download image file name)


ex:

./dfu-util -a kernel -R -D uImage-2.6.24+svnr4082-r4055-r3-neo1973.bin
Log into U-Boot in NOR Flash, connect your Neo with Linux Host via USB cable

Before you execute the command, please log into U-Boot in the NOR Flash. The Neo FreeRunner needs to be booted into U-Boot for flashing.

You will then need to connect your Neo with the GNU/Linux host via USB cable. Press Enter to execute the command. When flashing succeeds the following will be shown:

status(0) = No error condition is present
Done!

NOTE: The meaning of the parameters you specified:

-a --alt alt Specify the altsetting of the DFU interface by name or by number
-R --reset Issue USB Reset signalling once we're finished
-D --download file Write firmware from<file> into device


Step 3. Flashing the Root Filesystem

You can download the root filesystem from: http://downloads.openmoko.org/releases/Freerunner/

Type the following command in the terminal of a GNU/Linux host. On some systems you will need to be root.

./dfu-util -a rootfs -R -D openmoko-devel-image-fic-gta02.jffs2

When flashing succeeds the following will be shown:

status(0) = No error condition is present
Done!

Appendix

If you want to know more about the Neo FreeRunner then you can get more information in the following topics:
Tools