|
|
| (460 intermediate revisions by more than 100 users not shown) |
| Line 1: |
Line 1: |
| − | {{Languages|Getting Started with your Neo FreeRunner}}
| + | #REDIRECT [[Manuals/Neo FreeRunner]] |
| − | __NOTOC__
| + | |
| − | __NOEDITSECTION__
| + | |
| − | | + | |
| − | {| class="wikitable" cellspacing="2" cellpadding="2" style="padding: 0%; margin:0em 0em 1em 0em; border:1px solid #cccccc; background:#eeeeee; width:100%;floating="center"; "
| + | |
| − | ! style="background:#fcfcfc;border-left:1px solid #9999cc;border-right:1px ; border-top:2px solid 75d806; border:1px solid #222222; width:75% " |
| + | |
| − | <div align="left">
| + | |
| − | Thank you for purchasing this Developer release of Neo FreeRunner. The [[Neo FreeRunner]] phone is the second hardware platform to take advantage of Openmoko. This guide will help you know your Neo FreeRunner and how to starte use your Neo FreeRunner.
| + | |
| − | ! style="background:#fcfcfc;border-left:1px solid #9999cc;border-right:1px ; border-top:2px solid 75d806; border:1px solid #222222; width:25% " |
| + | |
| − | [[Image:DSC 0167.png|200px|thumb|Neo FreeRunner Package]]
| + | |
| − | |}
| + | |
| − | | + | |
| − | | + | |
| − | =Contents =
| + | |
| − | | + | |
| − | : [[Image:Circle2.gif|10px]] What Is In The Box
| + | |
| − | | + | |
| − | : [[Image:Circle2.gif|10px]] Getting To Know Neo FreeRunner
| + | |
| − | | + | |
| − | : [[Image:Circle2.gif|10px]] Turning On Neo FreeRunner
| + | |
| − | | + | |
| − | : [[Image:Circle2.gif|10px]] Flashing Neo FreeRunner
| + | |
| − | | + | |
| − | : [[Image:Circle2.gif|10px]] Connect To Neo FreeRunner By USB Networking.
| + | |
| − | | + | |
| − | | + | |
| − | == What Is In The Box==
| + | |
| − | | + | |
| − | {| class="wikitable" cellspacing="2" cellpadding="2" style="padding: 0%; margin:0em 0em 1em 0em; border:1px solid #ffffff; background:#ffffff; width:80%; floating="center"; "
| + | |
| − | ! style="background:#ffffff;border-left:1px solid #ffffff;border-right:1px ; border-top:2px solid ffffff; border:1px solid #ffffff; " |
| + | |
| − | <div align="left">
| + | |
| − | [[Image:GTA02ALL.png|400px|thumb|Inside package]]
| + | |
| − | |
| + | |
| − | | + | |
| − | : [[Image:Circle2.gif|10px]] Neo FreeRunner
| + | |
| − | : [[Image:Circle2.gif|10px]] Stylus
| + | |
| − | : [[Image:Circle2.gif|10px]] Battery
| + | |
| − | : [[Image:Circle2.gif|10px]] Charger
| + | |
| − | : [[Image:Circle2.gif|10px]] USB Cable
| + | |
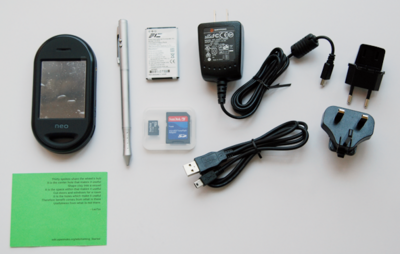
| − | : [[Image:Circle2.gif|10px]] microSD Card 512MB
| + | |
| − | |}
| + | |
| − | </div>
| + | |
| − | | + | |
| − | ==Getting To Know Neo FreeRunner==
| + | |
| − | | + | |
| − | <div align-center>
| + | |
| − | <table width="80%" style="clear: both; border: 1px solid #ffffff; border-collapse: collapse; padding: 0.2em; margin: 0; font-size: 100%; margin: 0 1px;">
| + | |
| − | <tr valign="top" style="background: #ffffff">
| + | |
| − | <td style="width: 25px; padding-left: 0.5em;">
| + | |
| − | </td>
| + | |
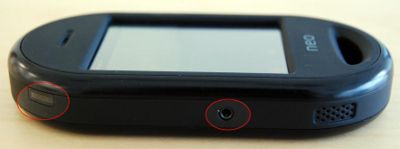
| − | <td style="width: 10px; white-space: nowrap; padding: 4px 1em 0 0.5em; border-right: 1px solid #ffffff;">[[Image:menu8.jpg|400px|thumb|AUX Button and phone jack(From left to right)|center]]</td><td style="padding: 1px 1em 0; background: #ffffff;">
| + | |
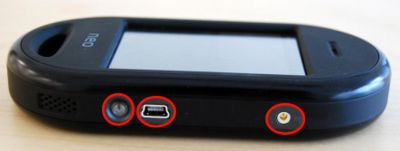
| − | [[Image:menu9.jpg|400px|thumb|Power, USB and external GPS Antenna (From left to right)|center]]</td></tr></table>
| + | |
| − | </div>
| + | |
| − | | + | |
| − | ===Turning On Neo FreeRunner===
| + | |
| − | | + | |
| − | You can boot your Neo FreeRunner in following ways:
| + | |
| − | | + | |
| − | : [[Image:Circle2.gif|10px]] You can power up into an Openmoko image directly.
| + | |
| − | | + | |
| − | : [[Image:Circle2.gif|10px]] Boot into [[Bootloader|U-Boot]] via [[NAND Flash]].
| + | |
| − | | + | |
| − | : [[Image:Circle2.gif|10px]] Boot into U-Boot via NOR Flash.
| + | |
| − | | + | |
| − | These ways allows you to update the kernel and root filesystem.
| + | |
| − | | + | |
| − | ====Log in Openmoko Image====
| + | |
| − | | + | |
| − | <div align-center>
| + | |
| − | <table width="100%" style="clear: both; border: 1px solid #ffffff; border-collapse: collapse; padding: 0.2em; margin: 0; font-size: 100%; margin: 0 1px;">
| + | |
| − | <tr valign="top" style="background: #ffffff">
| + | |
| − | <td style="width: 25px; padding-left: 0.5em;">
| + | |
| − | | + | |
| − | </td>
| + | |
| − | <td style="width: 10px; white-space: nowrap; padding: 4px 1em 0 0.5em; border-right: 1px solid #ffffff;">[[Image:Menu2.jpg|180px|right|thumb]]</td><td style="padding: 1px 1em 0; background: #eeeeee;">
| + | |
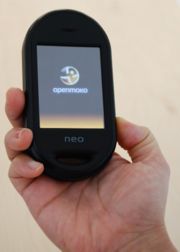
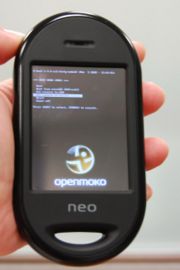
| − | Press and hold Power button (about 8 seconds) until Openmoko splash screen turns up. You may now release the Power button, and Neo FreeRunner will continue to boot into Openmoko Image.
| + | |
| − | | + | |
| − | </td></tr></table>
| + | |
| − | </div>
| + | |
| − | | + | |
| − | | + | |
| − | ====Log in U-Boot in NAND Flash====
| + | |
| − | | + | |
| − | <div align-center>
| + | |
| − | <table width="100%" style="clear: both; border: 1px solid #ffffff; border-collapse: collapse; padding: 0.2em; margin: 0; font-size: 100%; margin: 0 1px;">
| + | |
| − | <tr valign="top" style="background: #ffffff">
| + | |
| − | <td style="width: 25px; padding-left: 0.5em;">
| + | |
| − | | + | |
| − | </td>
| + | |
| − | <td style="width: 10px; white-space: nowrap; padding: 4px 1em 0 0.5em; border-right: 1px solid #ffffff;">[[Image:Menu7.jpg|180px|right|thumb]]</td><td style="padding: 1px 1em 0; background: #eeeeee;">
| + | |
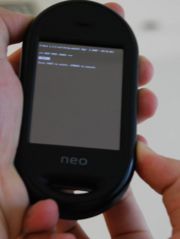
| − | Press and hold Power button, then press and hold AUX button (about 5~8 seconds ). You can see BOOT MENU for NAND Flash. Press AUX to select the options, Power to execute.
| + | |
| − | </td></tr></table>
| + | |
| − | </div>
| + | |
| − | ====Log in U-Boot in NOR Flash====
| + | |
| − | | + | |
| − | <div align-center>
| + | |
| − | <table width="100%" style="clear: both; border: 1px solid #ffffff; border-collapse: collapse; padding: 0.2em; margin: 0; font-size: 100%; margin: 0 1px;">
| + | |
| − | <tr valign="top" style="background: #ffffff">
| + | |
| − | <td style="width: 25px; padding-left: 0.5em;">
| + | |
| − | | + | |
| − | </td>
| + | |
| − | <td style="width: 10px; white-space: nowrap; padding: 4px 1em 0 0.5em; border-right: 1px solid #ffffff;">[[Image:Menu6.jpg|180px|right|thumb]]</td><td style="padding: 1px 1em 0; background: #eeeeee;">
| + | |
| − | | + | |
| − | Press and hold AUX button, then press and hold Power button. Release AUX button. You can see BOOT MENU for NOR Flash.
| + | |
| − | | + | |
| − | </td></tr></table>
| + | |
| − | </div>
| + | |
| − | | + | |
| − | You can download the connection tool from : http://svn.openmoko.org/developers/werner/neocon
| + | |
| − | | + | |
| − | Connect Neo FreeRunner to Linux host with USB cable and type in the following command in the terminal of a GNU/Linux host.
| + | |
| − | | + | |
| − | ./neocon /dev/ttyACM0
| + | |
| − | | + | |
| − | [Open]
| + | |
| − | ##Executing script at 18050100
| + | |
| − | mtdparts mtdparts=physmap-flash:-(nor);neo1973-nand:0x00040000(u-boot),0x00040000(u-boot_env),
| + | |
| − | 0x00800000(kernel),0x000a0000(splash),0x00040000(factory),0x0f6a0000(rootfs)
| + | |
| − | Ready.
| + | |
| − | DEVICE_CONFIGURED: 1
| + | |
| − | GTA02v5#
| + | |
| − | | + | |
| − | ===Flashing Neo FreeRunner===
| + | |
| − | As Openmoko development continues, Openmoko regularly releases updated versions of the Openmoko root filesystem, the kernel, and the[[Bootloader| U-Boot]]. These may be programmed into the Flash memory of Neo FreeRunner. You can use the USB cable and Openmoko provided tool to flash Neo FreeRunner.
| + | |
| − | | + | |
| − | Neo FreeRunner needs to boot into U-Boot when flashing.
| + | |
| − | | + | |
| − | You can download the flashing tool from:
| + | |
| − | http://buildhost.openmoko.org/daily/neo1973/deploy/glibc/images/neo1973/dfu-util
| + | |
| − | | + | |
| − | ====Flashing Kernel====
| + | |
| − | You can download the latest kernel from
| + | |
| − | http://buildhost.openmoko.org/daily/neo1973/deploy/glibc/images/neo1973/
| + | |
| − | | + | |
| − | Type in the following command in the terminal of a GNU/Linux host.
| + | |
| − | | + | |
| − | ./dfu-util -a kernel -R -D uImage-2.6.24+svnr4082-r4055-r3-neo1973.bin
| + | |
| − | | + | |
| − | When flashing succeeds
| + | |
| − | | + | |
| − | status(0) = No error condition is present<br>
| + | |
| − | Done!
| + | |
| − | | + | |
| − | ====Flashing Root Filesystem====
| + | |
| − | You can download the latest root filesystem from :
| + | |
| − | http://buildhost.openmoko.org/daily/neo1973/deploy/glibc/images/neo1973/
| + | |
| − | | + | |
| − | Type in the following command in the terminal of a GNU/Linux host.
| + | |
| − | | + | |
| − | ./dfu-util -a rootfs -R -D openmoko-devel-image-fic-gta02.jffs2
| + | |
| − | | + | |
| − | When flashing succeeds
| + | |
| − | | + | |
| − | status(0) = No error condition is present<br>
| + | |
| − | Done!
| + | |
| − | | + | |
| − | ====Connect To Neo FreeRunner By USB Networking====
| + | |
| − | | + | |
| − | Connect Neo FreeRunner to Linux host with USB cable. After booting into Openmoko image, there will be a new interface, usb0, in your Linux host.
| + | |
| − | | + | |
| − | =====Manual Method=====
| + | |
| − | Type in the following command in the terminal of a GNU/Linux host.
| + | |
| − | | + | |
| − | ifconfig usb0 192.168.0.200 netmask 255.255.255.0
| + | |
| − | ssh root@192.168.0.202
| + | |
| − | | + | |
| − | Press Enter to pass the password.
| + | |
| − | | + | |
| − | =====Automatic Method=====
| + | |
| − | *Debian and derivatives (Ubuntu, Sidux etc.)
| + | |
| − | Edit /etc/network/interfaces
| + | |
| − | | + | |
| − | auto usb0
| + | |
| − | iface usb0 inet static
| + | |
| − | address 192.168.0.200
| + | |
| − | netmask 255.255.255.0
| + | |
| − | | + | |
| − | Restart the networking service and type in the following command in the terminal of GNU/Linux host.
| + | |
| − | | + | |
| − | ssh root@192.168.0.202
| + | |
| − | | + | |
| − | Press Enter to pass the password.
| + | |
| − | | + | |
| − | =====Making things even more automatic=====
| + | |
| − | If you don't want to remember the IP number of your phone you can create an alias by adding the following line to your /etc/hosts:
| + | |
| − | | + | |
| − | 192.168.0.202 openmoko
| + | |
| − | | + | |
| − | Now it should immediately be possible to connect your phone using the following command line:
| + | |
| − | | + | |
| − | ssh root@openmoko
| + | |
| − | | + | |
| − | | + | |
| − | ==FAQ==
| + | |
| − | | + | |
| − | | + | |
| − | | + | |
| − | You can download the connection tool from : http://svn.openmoko.org/developers/werner/neocon
| + | |
| − | | + | |
| − | Connect Neo FreeRunner to Linux host with USB cable and type in the following command in the terminal of a GNU/Linux host.
| + | |
| − | | + | |
| − | ./neocon /dev/ttyACM0
| + | |
| − | | + | |
| − | [Open]
| + | |
| − | In: usbtty
| + | |
| − | Out: usbtty
| + | |
| − | Err: usbtty
| + | |
| − | PCB rev: 0x000
| + | |
| − | switching led 2 0
| + | |
| − | switching led 2 1
| + | |
| − | switching led 2 0
| + | |
| − | DEVICE_CONFIGURED: 1
| + | |
| − | GTA02v5#
| + | |
| − | | + | |
| − | | + | |
| − | | + | |
| − | [[Category:Software]]
| + | |
| − | [[Category:Documentation]]
| + | |

